Confusing to say the least…
Confusing to say the least…
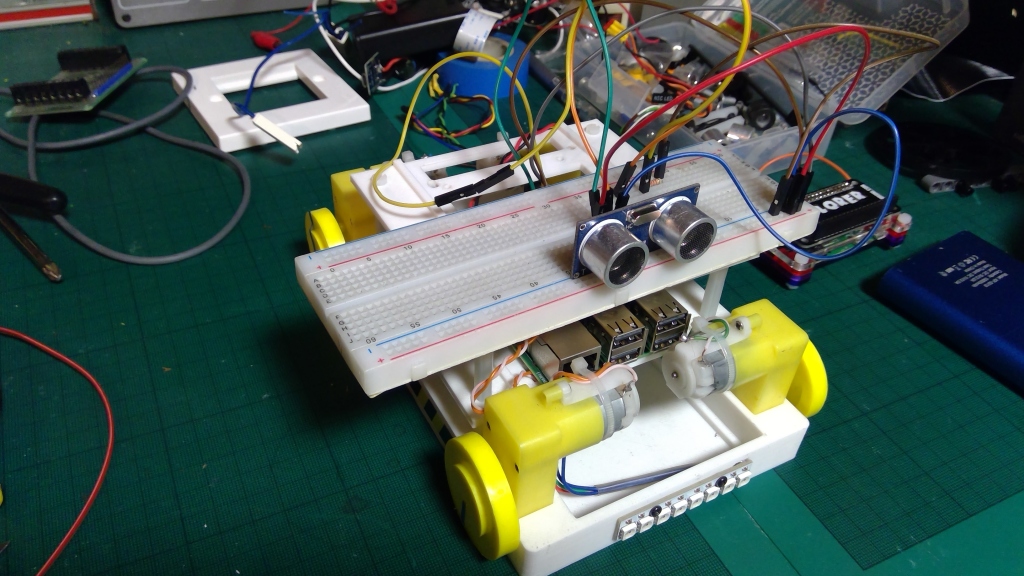
I’ve begun to work on a small project I want to install in my 4×4… It’s all become very confusing as I’ve become rusty throughout this Covid period and working from home somehow takes up much more time than usual. These groundhog days have seen me picking away at many different projects but never really finishing one, which is frustrating!
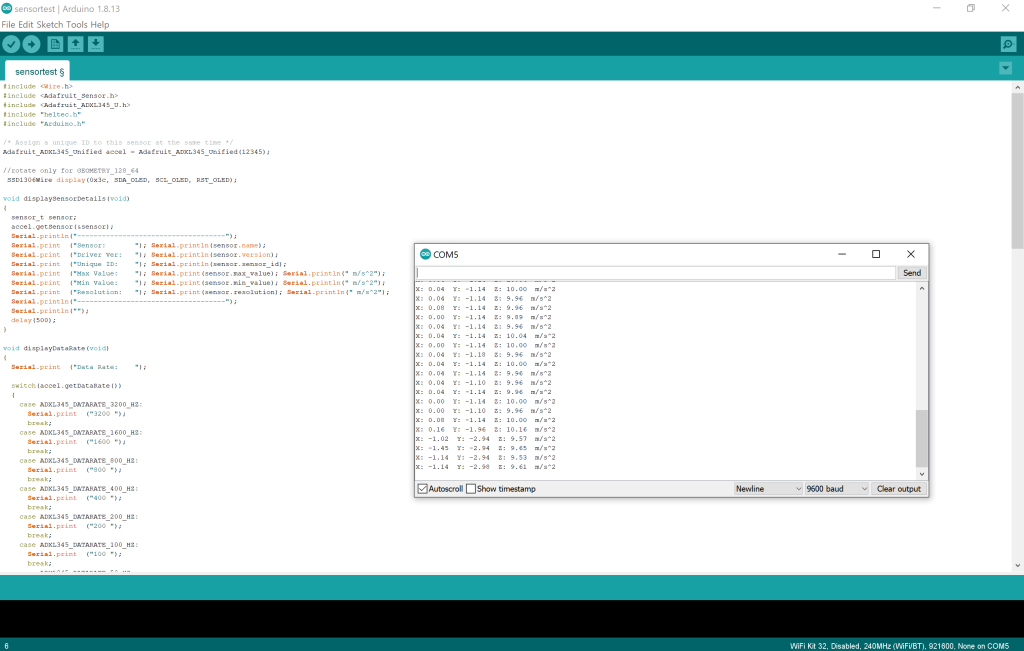
Here’s a prime example, my little Haltec ESP32 Inclinometer project! I want to have the onboard OLED display the pitch and roll of my vehicle and the only sensor I have that’s anywhere near capable of doing this is an ADXL345 which was in one of the drawers.
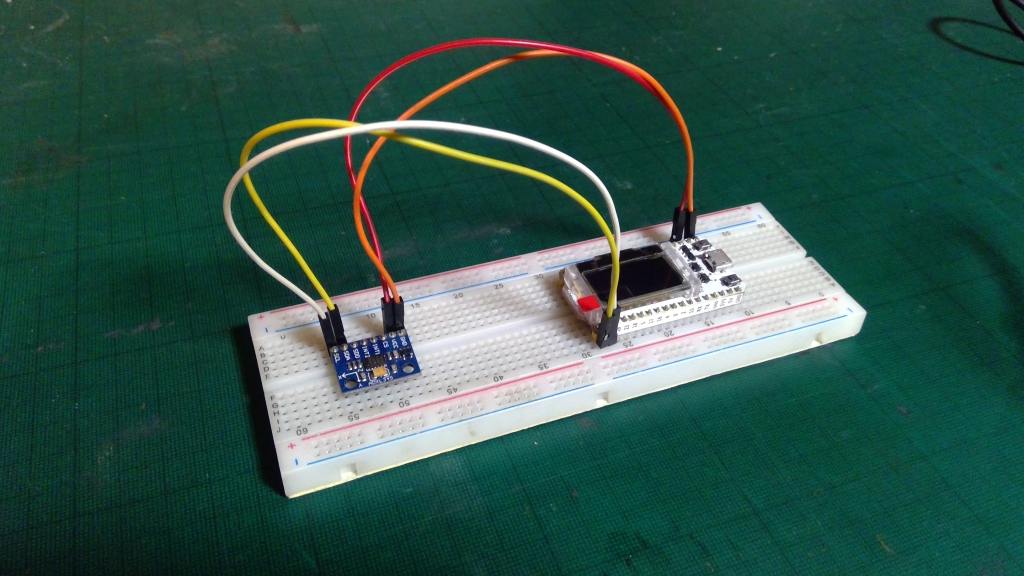
So far it will output to the ADXL345 sensor values to the serial console but I’ve not quite figured out how to use the OLED text rotate example sketch to get the onboard OLED to display anything. Loaded up, each sketch works fine but combining them together is confusing my brain. I’ll keep at it as I’ve seen other similar projects online so it’s just a case of more R&D.
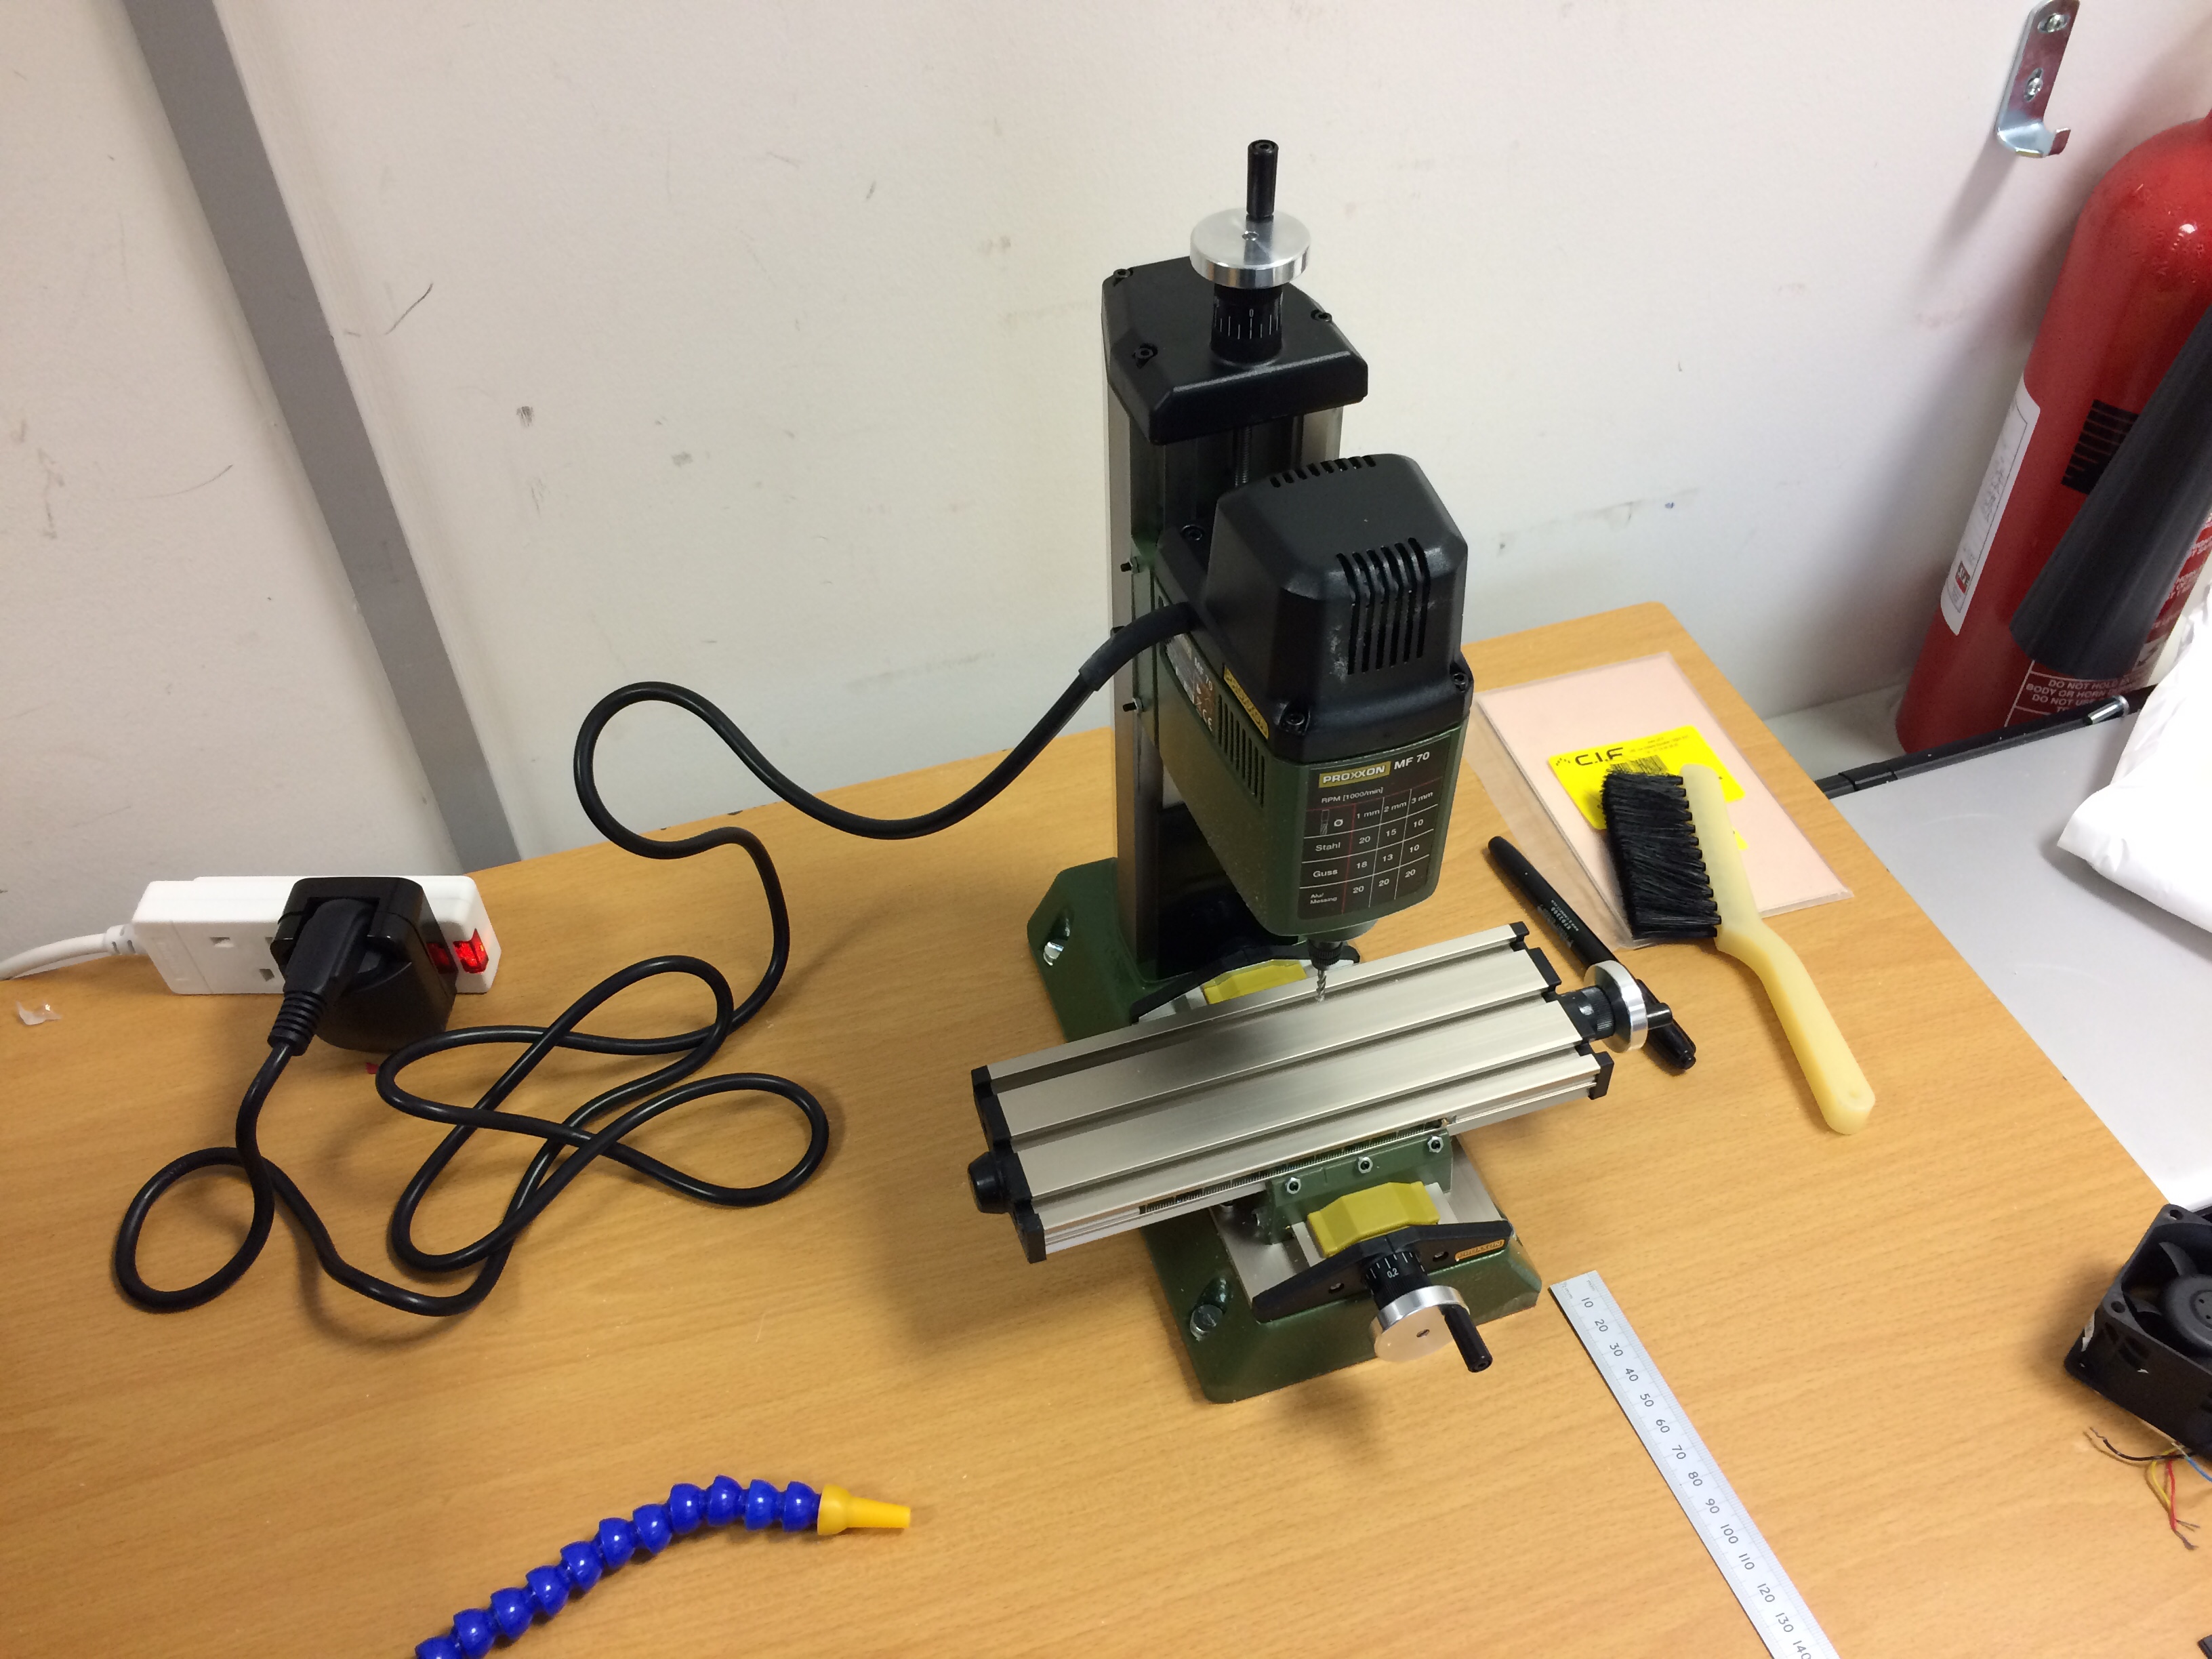
For a long time I’ve been frustrated by my lack of tooling in the workshop when it comes to milling things so I recently upgraded with a baby machine, the teeny tiny Proxxon MF70:

This little monster is small but, well small. However it’s not without spirit and it should fulfil my dreams of making boards for my various electronics projects once I have it fettled by upgrading to CNC…
Here we see it set up on a desk as it comes out of the box…
Behold!
This is my very first encounter with making a CNC machine and I’m a complete newbie so I made a lot of fumbles but I’m lucky that my friend Elliott has experience in this field and had some very specific ideas of how he thought this should be tackled, which was very handy in getting off to a quick start!
Our plan involved 3D printing parts to couple stepper motors to the axis, driven by controller modules that are being mastered via the parallel port on a pc.
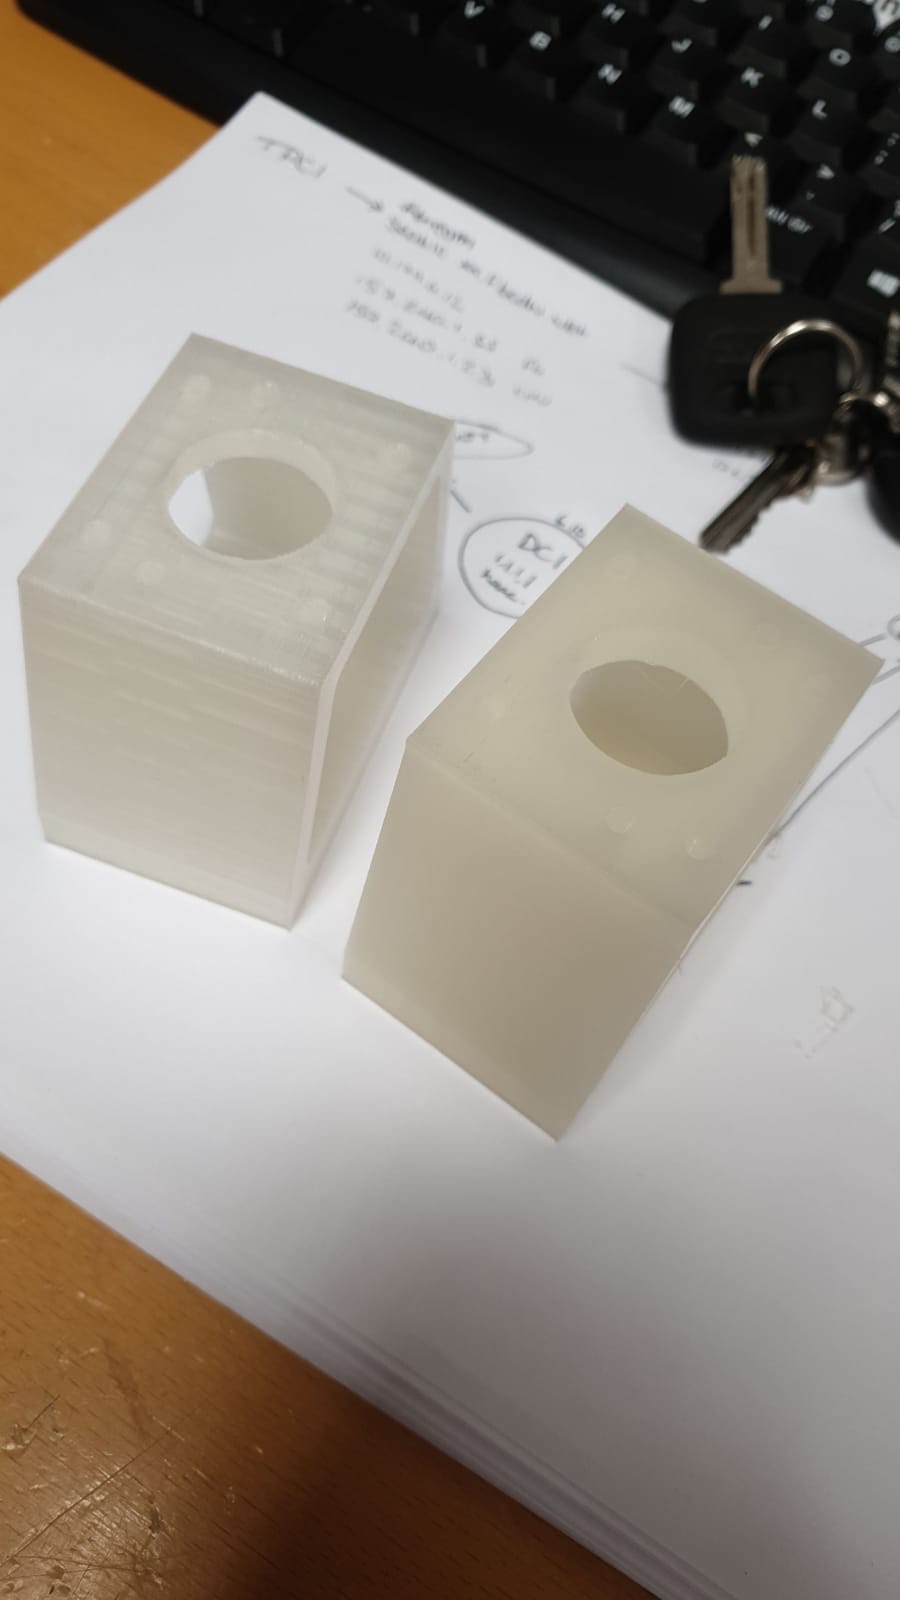


While we waited for parts to arrive we took the time to properly develop the 3D printed models and re-assemble. I found that in order to remove the axis spindles you need to punch out a small retaining pin which I was confounded by for a while.
We were going to drive the machine with an arduino and a CNC shield but it became apparent that this was a shit idea and instead we decided to butcher the (Elliott’s) robot arm project for proper drivers, or at least the best that we had in the workshop that were sort of spare…

To drive the setup we have a version of Mach3 running on a suitable PC of which it took a lot of staring at google and YouTube videos to suss out how to configure the archaic pins dialogue box and the various other Windows95 looking parts of the interface.
Roughly wiring it up we can see the potential in the set up, I think it’s pretty good so far, the parts were printed solid and were all 9hr or so prints on the Prusa but I thought solid would be more dependable.
Here it is in action, I like the noises it makes.
The contraption still needs the Z axis sorted out but I should get that printed this weekend, with luck my measuring won’t be too far out and it will bolt on without issue and I can move on to wiring it up.
It’s worth noting that you can find lots of other takes on this idea already finished online and there’s even a file on Thingiverse if you want to skip making your own but we don’t think it’s very good and unscrupulous types are flogging them on eBay…
Having recently found the excellent resource that is Pimoroni I’ve been splurging on modules to tinker with.
Pimoroni make very aesthetically pleasing boards and modules to experiment with and back it up with code and community, well done guys I’m a big fan of your gear and I use it in my Code Club every session. I like their equipment because it’s very easy to ‘stack’ hats and quickly build examples to illustrate a point to my students, this is especially useful as the boards have nice silkscreen graphics which appeal to everyone. I’m not invested in Pimoroni in any way other than having become a loyal customer and their store my go-to site for this kind of thing. No bias involved here!
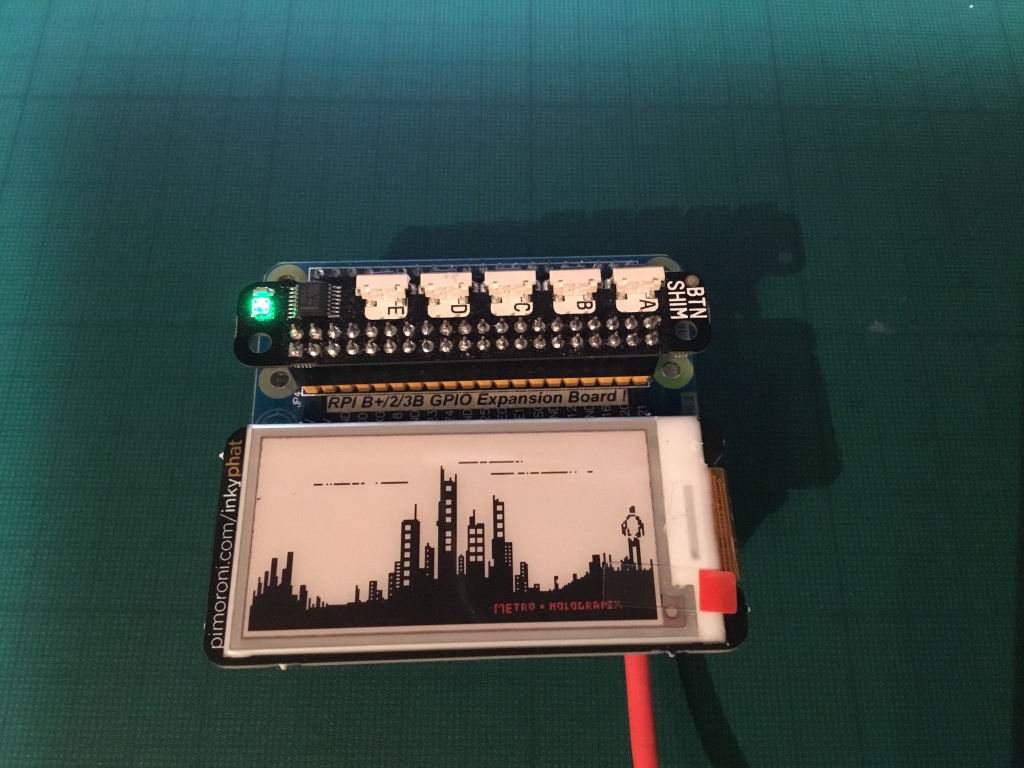
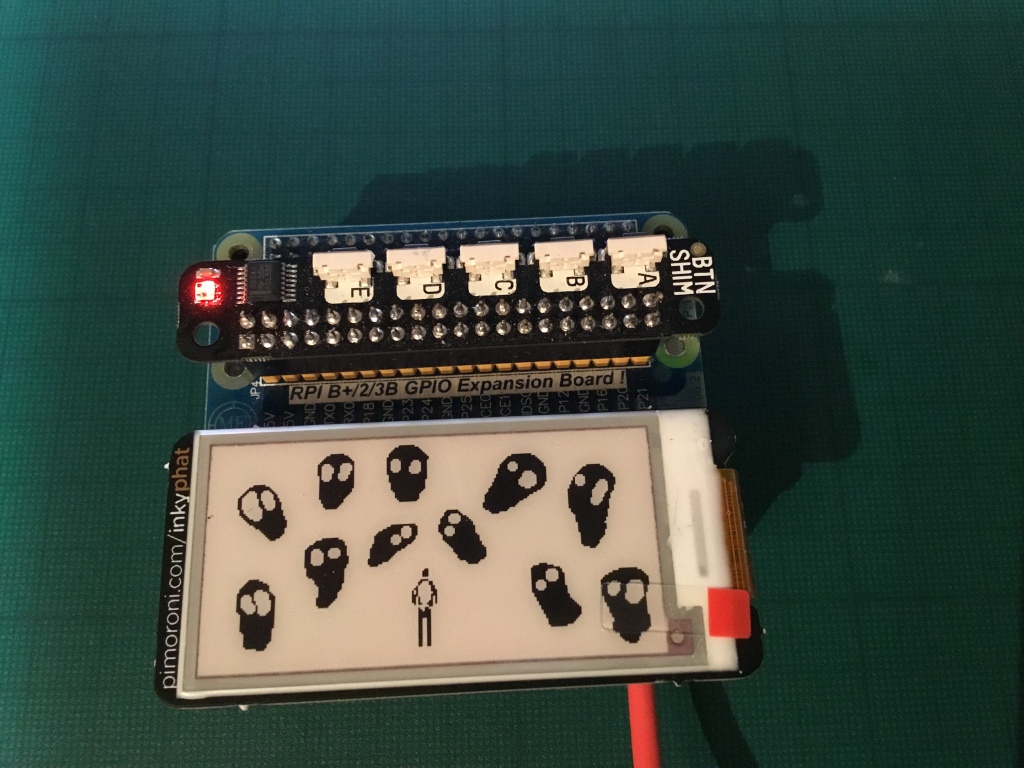
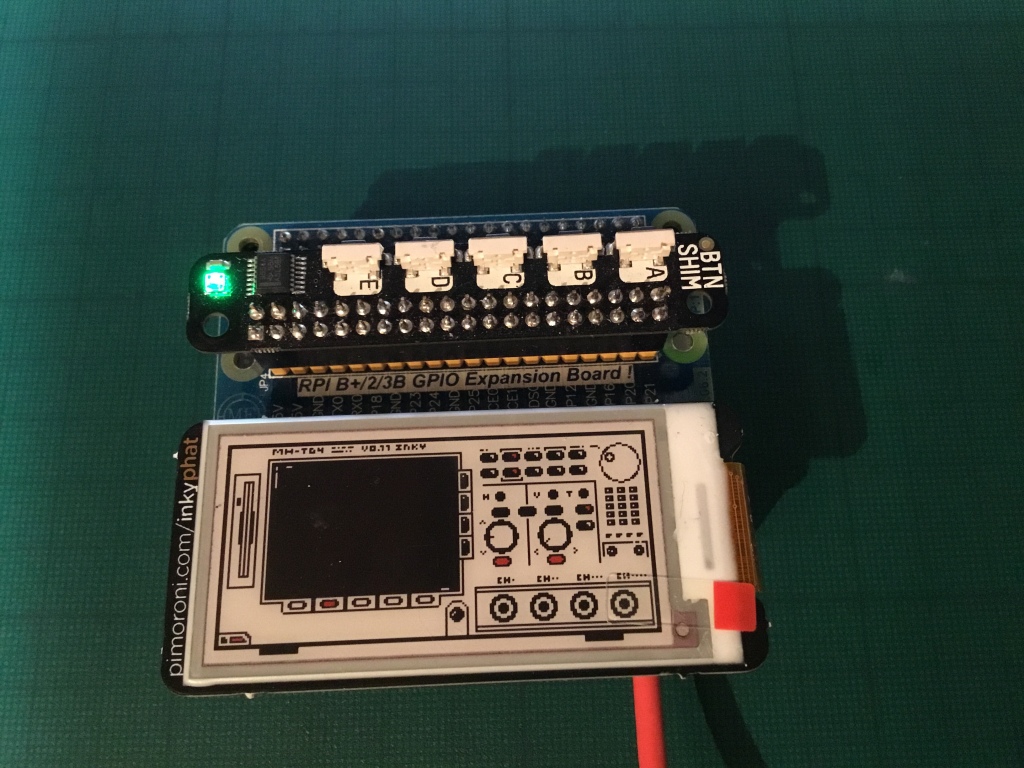
So anyway I found myself with a BTNshim and a red version of the InkyPHAT (an e-ink hat module for the Raspberry Pi). I really must thank Pimoroni for developing this little board, e-ink seems to be a technology only just beginning to blossom and I found e-ink plus the hat form-factor were a power combo! I bought several red boards and several black and white boards (one of which I did manage to break) to play around with.
Wondering what I would do with them and gazing at the InkyPHAT attached to a PiZero in my hand I think reminded me of holding an old LCD Game because neurons fired and I reckoned I could make some kind of visual game of some kind using the BTNshim buttons to control stuff I hoped would happen.
So that’s what I had planned and I’m this far along! I have a PiZero W with a breakout board connected attaching the InkyPHAT and BTNshim to the various required pins and lines on the Pi. I have a Python program written to test things out which loads some .png files from a directory on the Pi microSD card, beginning by flashing a white only image to clean up whatever was left over from last time – remember that e-ink retains the last image it displayed even when power is removed so this seemed like a sensible step to take.
So speaking of images there are a few lessons I needed to learn in order to get this whole concept out of it’s squalid nest of sleeping bags and doing something vaguely interesting.
Getting images on the go was (for me) a bit of a pain in backside as I was unfamiliar with GIMP which is the graphics program I use to create images for the InkyPHAT but I was on a train for some hours one day and had the time to sort of get to grips with GIMP and master the incantations. In a nutshell once we have GIMP fired up we need to load a custom colour palette, create our art using the custom palette and then export the .png while making sure the ticky box for ‘save background colour’ is adequately ticked. This saves the file in a manner with which the InkyPHAT can use – something which relates to a technicality in the way the e-ink displays work.
Once I had the images in hand I set to work shakily coding the software in Python to run things…
Being absolutely useless in Python I had to rely on much googling (which yielded very little) but after reading the docs many times and failing many times over until I had brute forced the code to run.
I have managed to get the contraption to respond to a button press on the A B C D or E buttons of the BTNshim and display an image on the InkyPHAT so I have a starting point that I can develop my project from, at some point I will design and 3D print a fitting enclosure. In order to use the code you will need to make a folder with suitably named images at:
/home/pi/Pimoroni/inky/examples/img
!/usr/bin/env python
import time
import subprocess
import signal
from PIL import Image
import sys
import buttonshim
from inky import InkyPHAT
print(“””InkyPHAT RED with buttonshim test.
Note: Display needs time to chooch so go easy on the button pressing, watch for LED indicator on button shim for status…
“””)
inky_display = InkyPHAT(“red”)
cooldown = time.time() – 2.5
lastbutton = “”
inky_display.colour = ‘black’
inky_display.set_border(1)
inky_display.rectangle((0,0, 212,104), fill=1, outline=0)
def flash(length, col):
if col == 1: #red
buttonshim.set_pixel(255,0,0)
else: # green
buttonshim.set_pixel(0,255,0)
time.sleep(length)
def display(image,button):
global cooldown
global lastbutton
if lastbutton == button:
print(“ERROR: Image already loaded!”)
return
elif time.time() – cooldown < 2.5:
print(“Just a moment…”)
return
else:
flash(0,1)
inky_display.set_image(Image.open(image))
inky_display.show()
cooldown = time.time()
lastbutton = button
flash(2.5, 2)
display(“/home/pi/Pimoroni/inky/examples/img/imgwht.png”, “0”)
@buttonshim.on_release(buttonshim.BUTTON_A)
def button_a(button, pressed):
display(“/home/pi/Pimoroni/inky/examples/img/img1.png”, “a”)
@buttonshim.on_release(buttonshim.BUTTON_B)
def button_b(button, pressed):
display(“/home/pi/Pimoroni/inky/examples/img/img2.png”, “b”)
@buttonshim.on_release(buttonshim.BUTTON_C)
def button_b(button, pressed):
display(“/home/pi/Pimoroni/inky/examples/img/img3.png”, “c”)
@buttonshim.on_release(buttonshim.BUTTON_D)
def button_b(button, pressed):
display(“/home/pi/Pimoroni/inky/examples/img/img4.png”, “d”)
@buttonshim.on_release(buttonshim.BUTTON_E)
def button_b(button, pressed):
display(“/home/pi/Pimoroni/inky/examples/img/img5.png”, “e”)
signal.pause()
Please check back soon for updated content!
Also I plan to make available some vintage software I have been archiving from platforms such as BBC Micro, RISC PC, Atari, Macintosh, Windows and some misc uncatagorised.
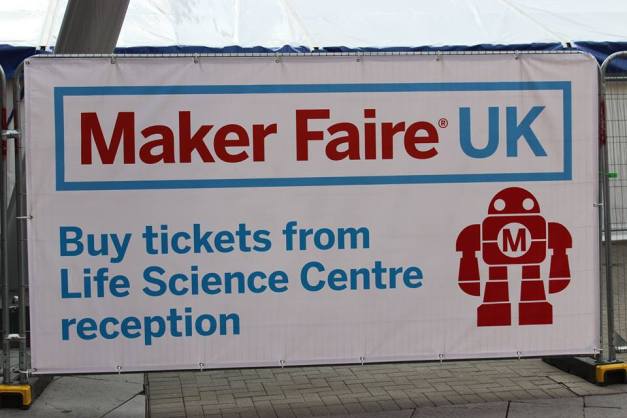
Greetings to makers of all types!
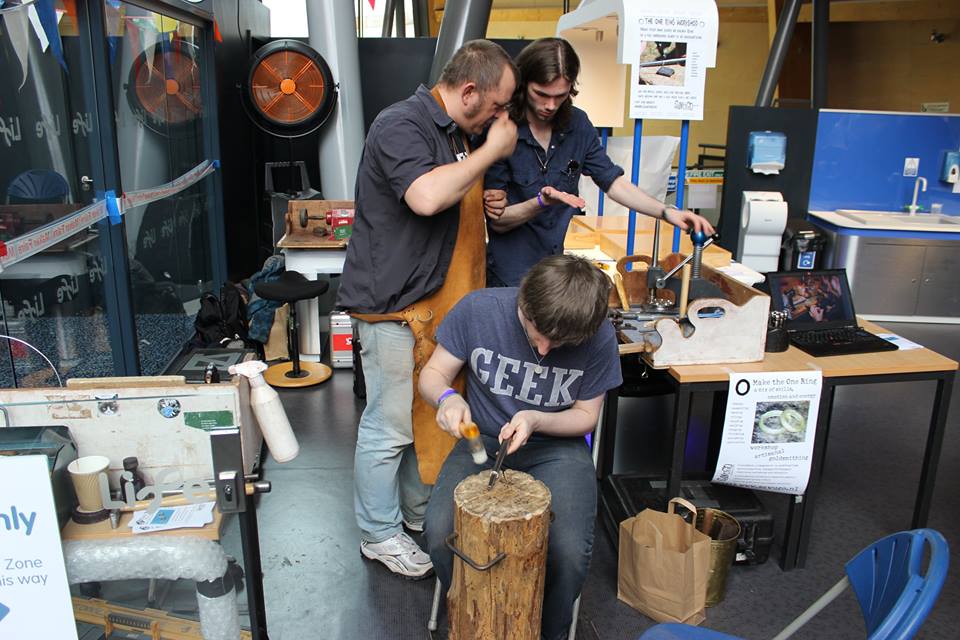
This past weekend was the annual Maker Faire held in the Newcastle Centre for Life.
I had been looking forward to it for some time and I wasn’t disappointed! The event was a cornucopia of various Maker type stalls attractions and talks, all of which worthwhile and informative even if the topic wasn’t your particular discipline.
I can’t thank the assorted makers enough for bringing along their wares and taking the time to enthral, inspire and delight us for two whole days – I can’t wait for next year!
I couldn’t possibly recount everything that went on but I’ll elaborate on some of the images I’ve captured and try to give an impression of what was going on:
(Have mercy on my photography skills, I’m still learning how to use a DSLR)
Getting there was easy enough as I only live a half hour’s drive from the City, I unpacked the kids and headed straight over. The crowds were initially very busy around the entrance but it soon thinned to the point where we could all get in – it cost me £12 for one adult £7 for one Junior (6-12) and my daughter got in free as she’s still under 5 – very reasonable for what you got…
…check it out!
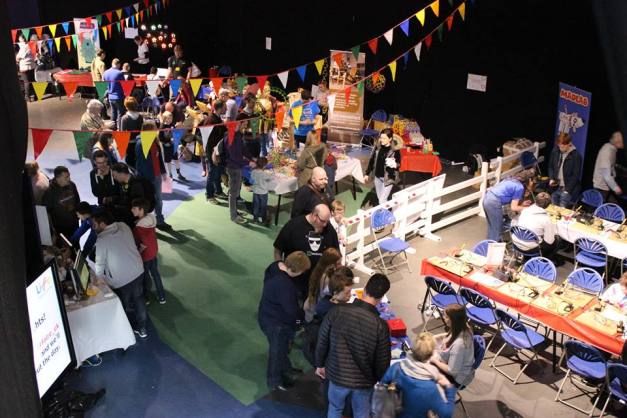
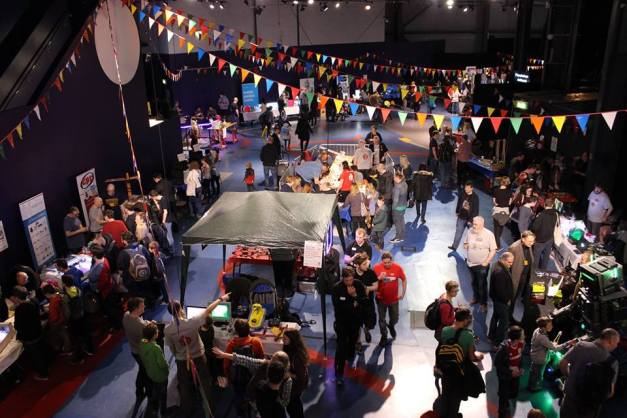
This was only the half of it, I tried to take documentary photos and sweeping overviews but really I got too carried away with trying to not lose my children in the crowds and to investigate what was on offer.
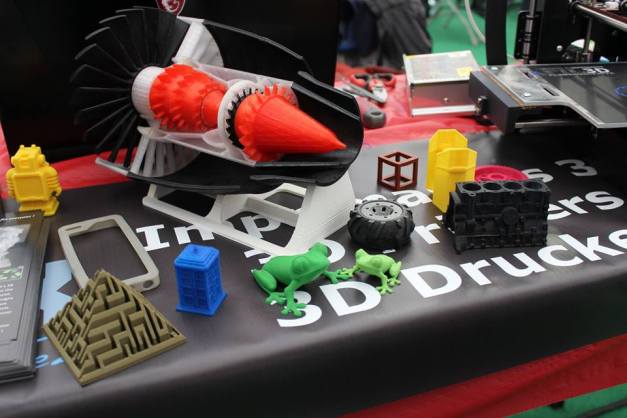
There was the usual offering of 3D printed goods which I felt were no better quality than my moderately tweaked and well ‘dialled in’ Makerbot Replicator 2 however seeing firsthand some output with bizarre filaments I’ve not used such as flexible stuff was interesting as was the startup pictured below which hoped to bring 3D printing capabilities to some lesser developed areas:
I saw some kind of pick and place self replicating printer which I think had something to do with Bristol University, however I was too busy being impressed by their RFID(?) tagged lego bricks called PhysiCAD which they were using for rapid prototyping / design. The bricks had rules applied to them such as ‘this brick is super heavy’ so you couldn’t design something over say underground pipework.
I was impressed and they invited me to play with the bricks – I made a spaceship which is probably online somewhere…
I saw this very loud Macintosh powered audio equipment:

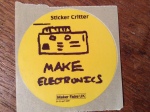
My kids got to use this orange furry sticker machine:
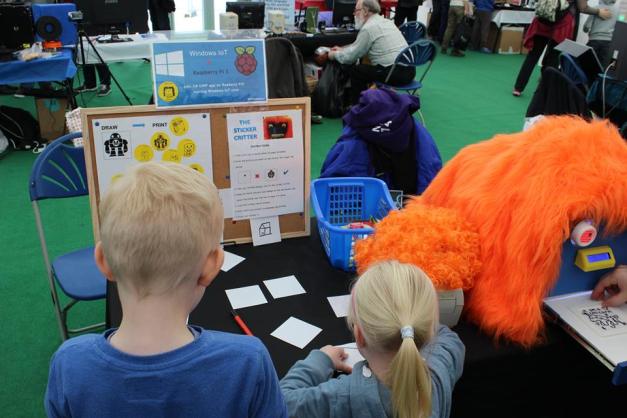
Here’s the sticker I made…
One of the things I like most about this sort of event is looking at things I wouldn’t normally have any interaction with such as these really cool latex masks made by Ray Phillips, my kids loved the Storm Trooper head but I was more of a Davros man.


I spent some time discussing how 3D printing was changing his particular craft and he told me about how he’d had to re-tool to 3D modelling with software which seemed like a bit of a shame to me, although clearly he wasn’t bad at it!
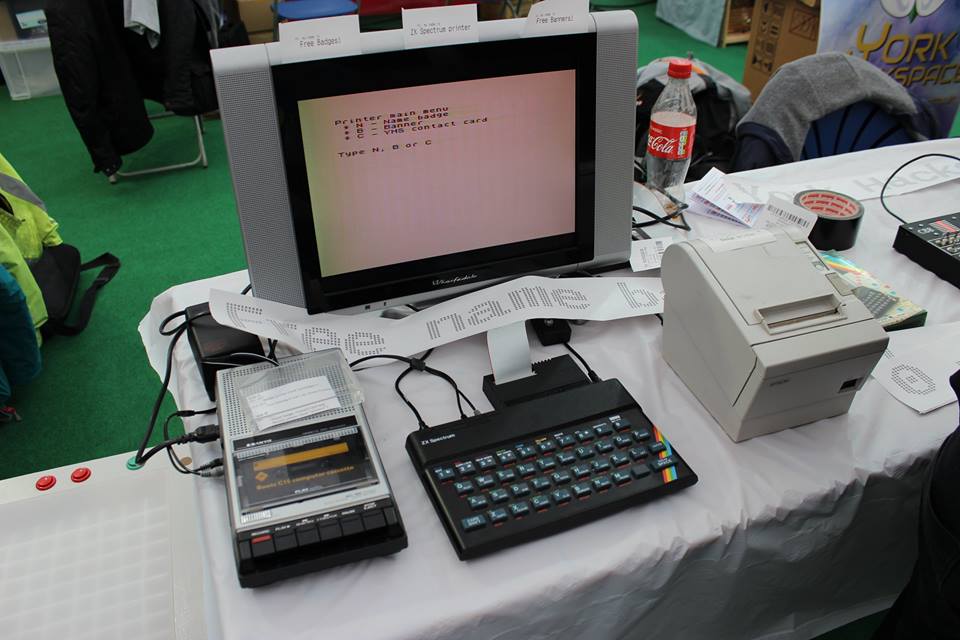
Moving along I found an exhibit with a ZX spectrum running a banner printing program, I didn’t check to see if it was the 16k version or not as clearly it had enough for the job.
…They also had this awesome replica PDP 8/1
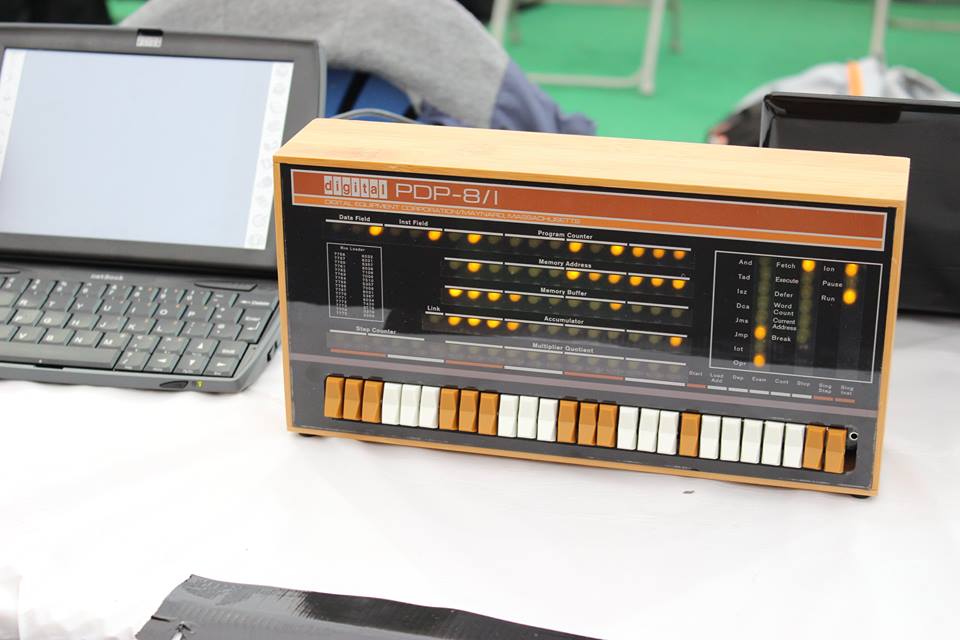
Very nice.
There were some guys over from Amsterdam making rings:
There was a real Brain that someone had donated to science. I spent some considerable amount of time attempting to communicate with it but eventually my son got freaked out and we had to move on.
The brain is the most important organ you have…

…According to the Brain
I saw a giant Drone but I have very little knowledge on the subject so I shuffled along quietly impressed by the payload capacity and general size of the thing, looks like something you could strap to your back and take off.

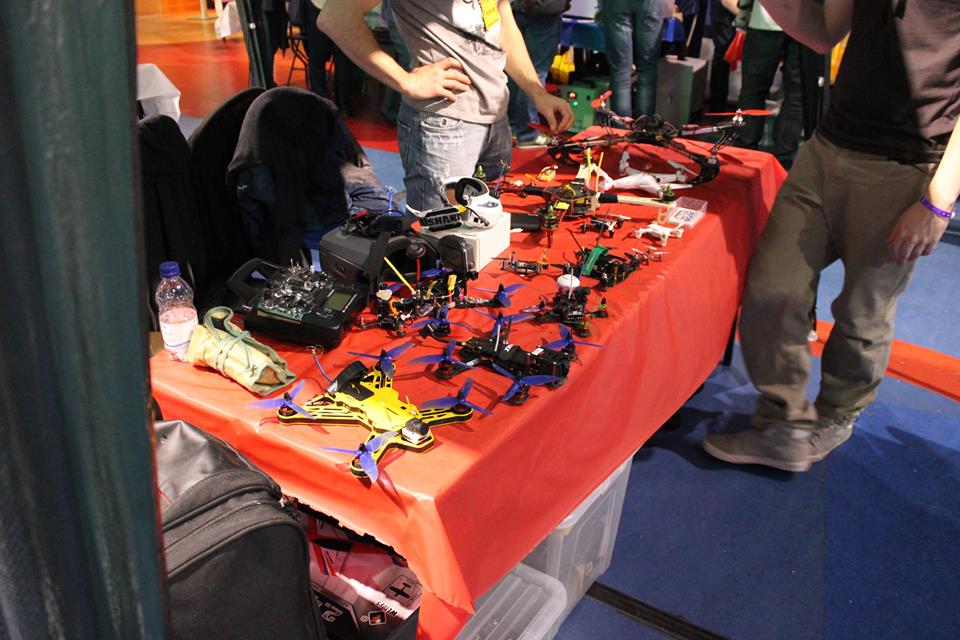
Elsewhere in the event they were racing mini drones with an FPV setup which was very popular, I think this was the racing drones display, they all kind of look the same to me…
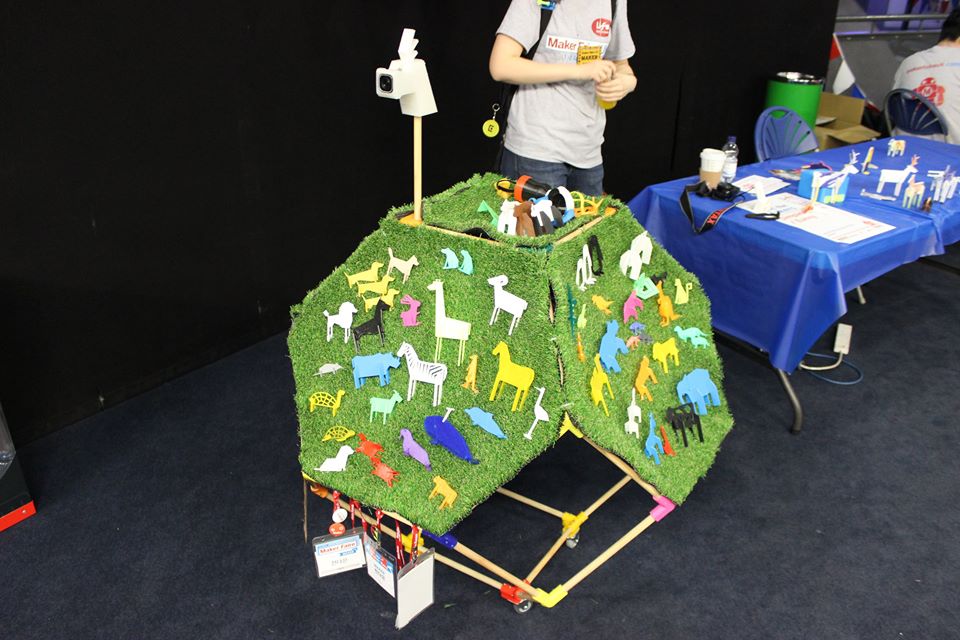
Eunny’s awesome mobile display of 3D printed and Laser cut animals, she has awesome business cards!
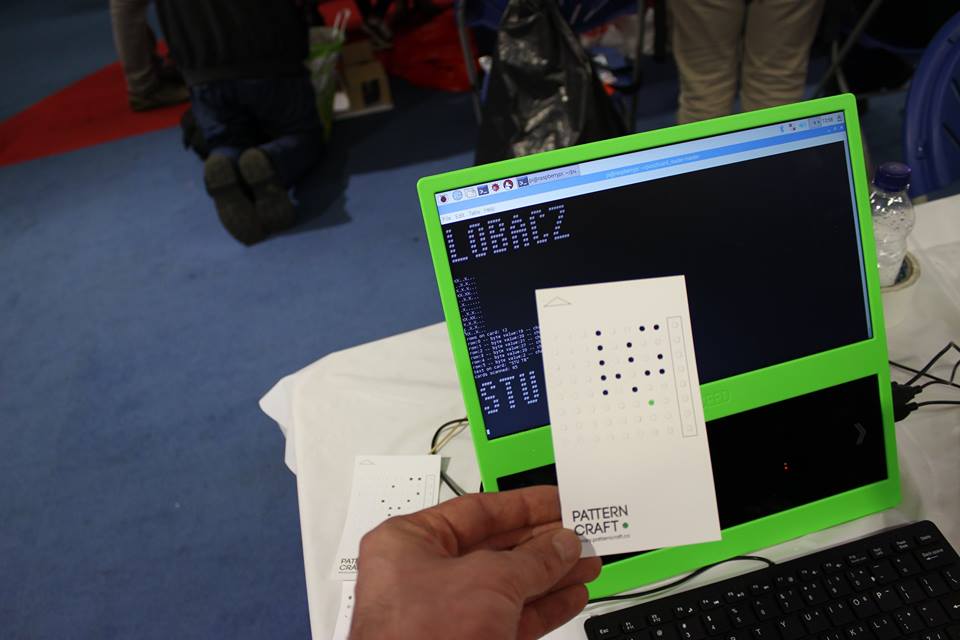
A Pattern Craft punchcard which I’ve subsequently laminated and am using as a bookmark.
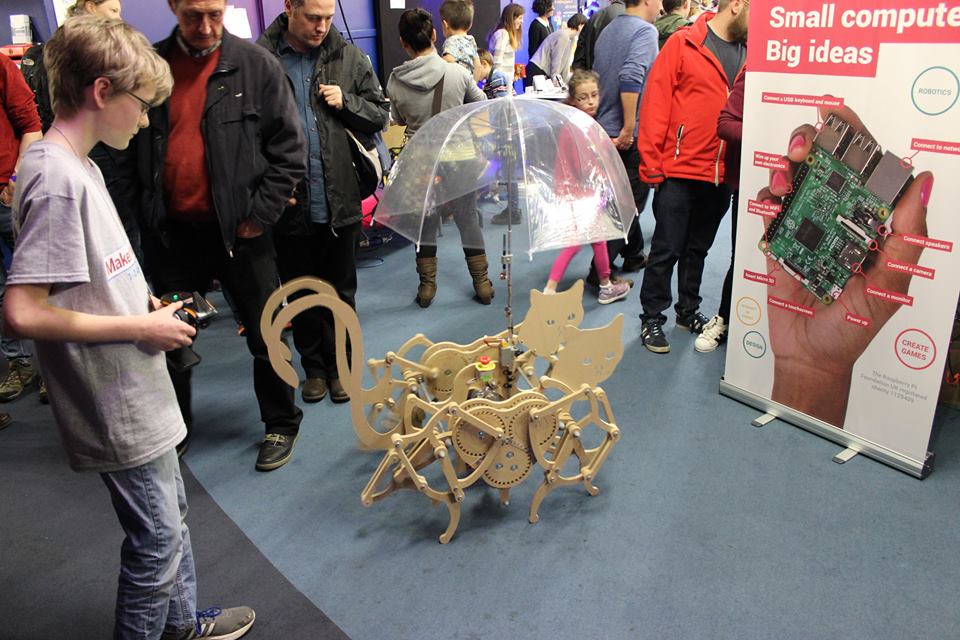
A remote control Cat device of some kind:
A wandering Band!

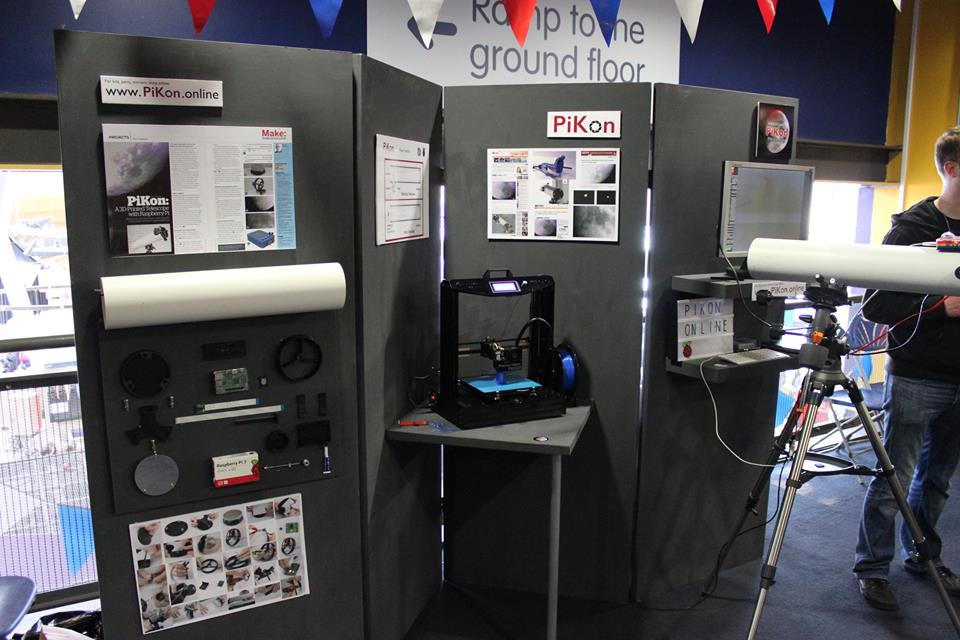
Here’s a really cool Telescope which used a Raspberry Pi camera and 3D printed parts. I told him he should definitely take it over to the Kielder Observatory for a trial run. You can also buy the parts as a kit if you didn’t already have them, checking my workshop at home I lack only the tube and the mirror which a good friend of mine might be able to help me out with… hint hint… :-)
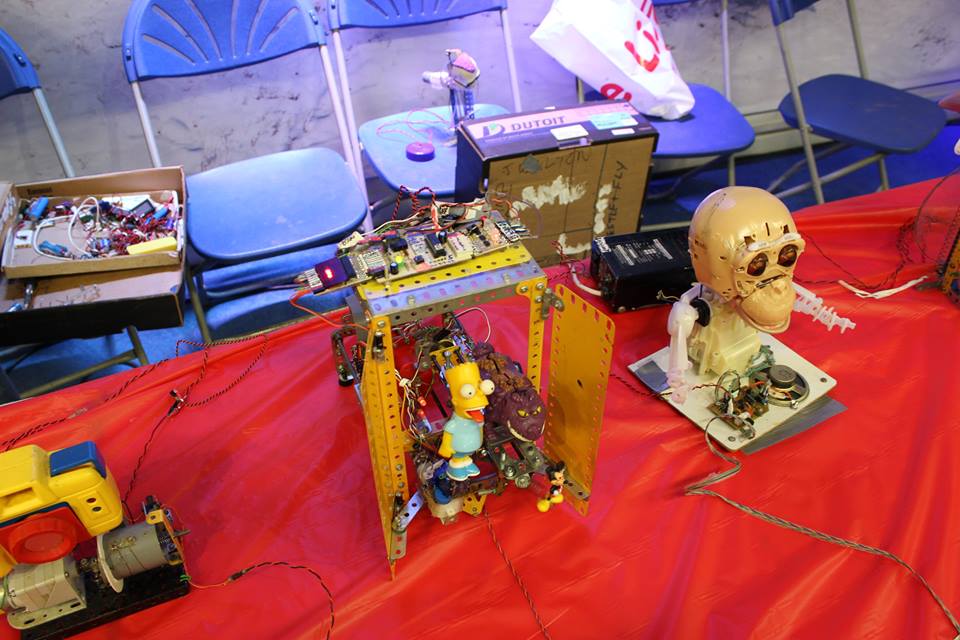
I came across a display of automata brought along by a friendly ex teacher, I wish I had a few masters more like him back when I was at school! He had the children enthralled with his cunning mix of toys and home-brew electronics wizardry…
…His good wife told me she used to accompany him to various shows and sit there stitching until one day she decided to set up her own display of artistic stitch-craft which I thought was very well done.

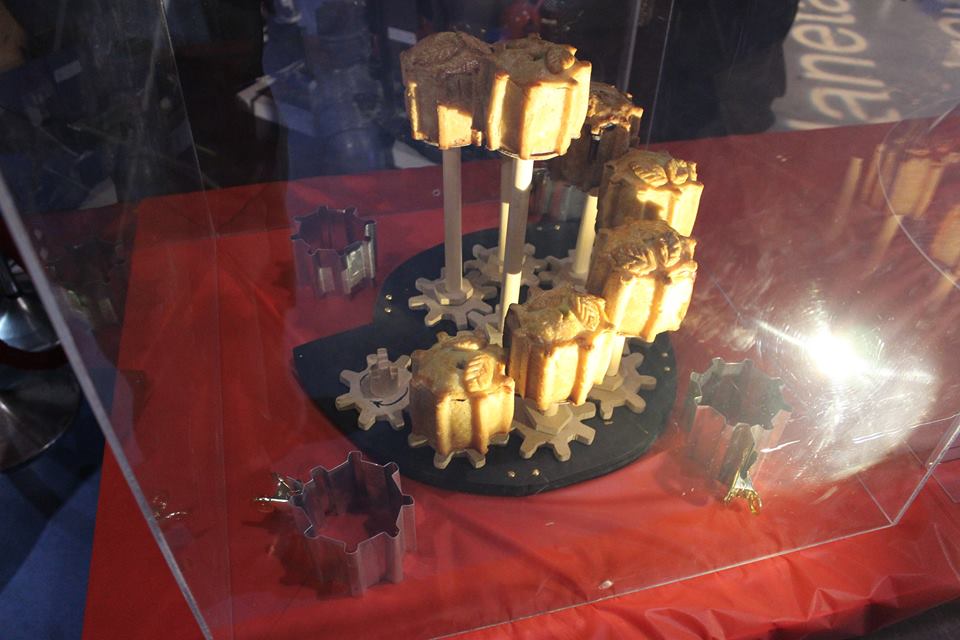
I don’t know who made these cog pies (possibly someone from the Great British Bake-Off) but I could have easily been thrown out for trying to eat them…
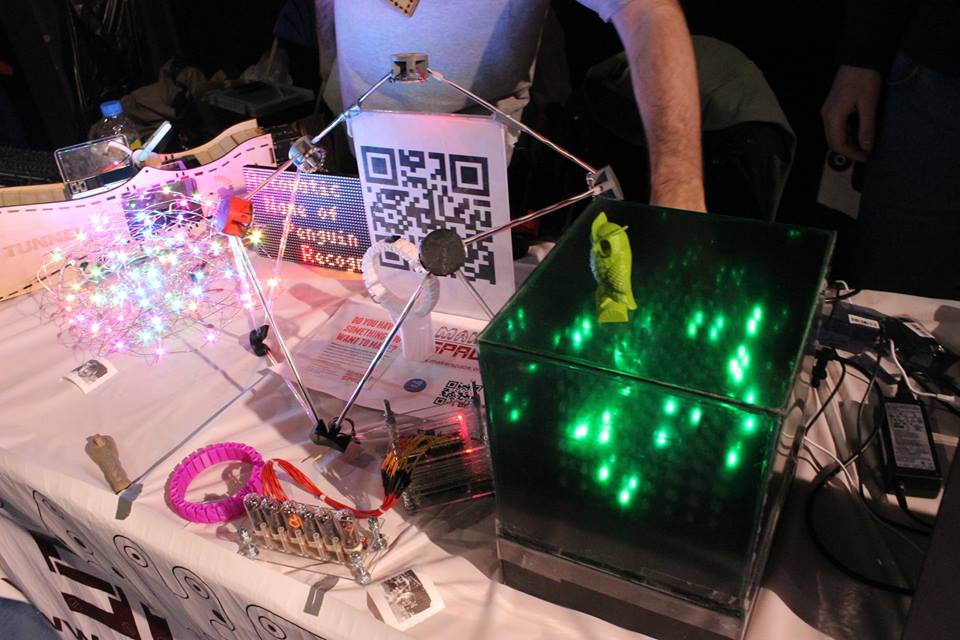
While wandering around I happened upon the smallest LED cube I’d ever seen in my life made out of surface mount components. While inspecting it a friendly guy called Ben turned up and explained he was the one who had made it and he was a member of what happened to be my local makerspace. I don’t get much spare time with having a full time job and two hungry kids but it was great to chat and I hope to make an appearance there soon as you can only do so much in your home workshop.
(Ben’s cube is the tiny black speck in on top of the white ring in the centre of the picture)
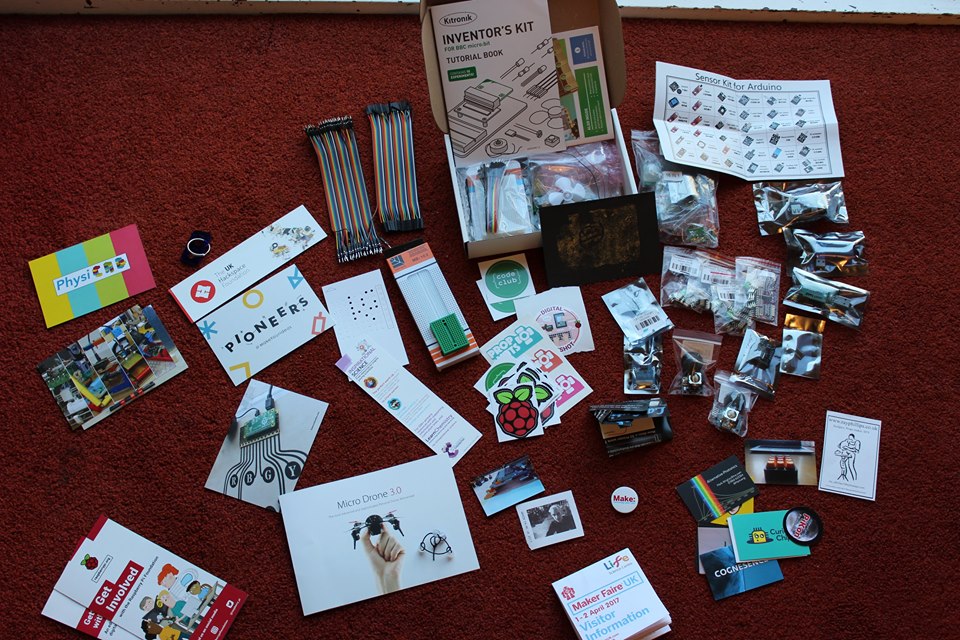
I could have spent all weekend there at the faire and I would have done except I had prior commitments which I could not cancel out of so I had to cram everything that I wanted to see into one day, next year I’ll ensure that I clear the calendar as I had to make do with coming away with only this much swag:
For an exhaustive list of everyone who attended click here!
Flashing the firmware on that Meraki MR12 cloud managed AP to LEDE, what fun!
Quite a few MR12 / MR16 AP’s were handed out by Cisco Meraki for attending a webinar they were running on why you should buy this sort of thing. Free AP’s are all well and good however the limitation was that they were Cloud managed and had an expiry date on how long you got this for free… I had one sitting around and recently after I upgraded our home broadband connection and I found that the ISP we chose had sent out a (really naff) new router it seemed like a good time to bring out the MR12 and harness its finer qualities…
…Hence this post:
Hardware: You’re going to need a Laptop, a means of interfacing with the UART port on the MR12 (I used a USB 2.0 to TTL UART 6PIN CP2102 amazon special) and a bit of patch cable.

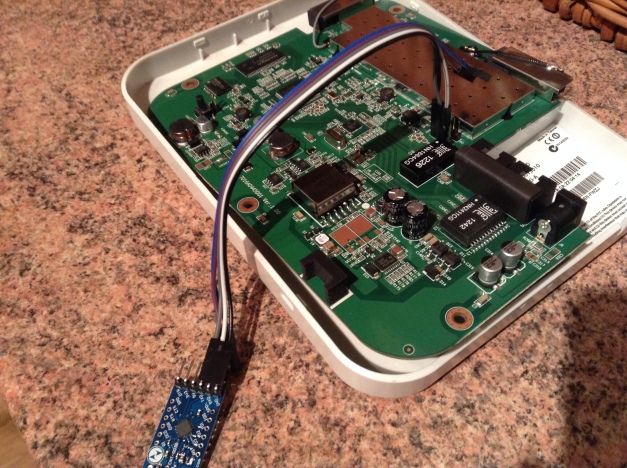
Here’ a nice picture of the way I have the serial interface connected.
Software: I used a windows laptop to flash this MR12 with the IPV4 adapter set to 192.168.1.101 (the default IP for the firmware I’m using on the MR12 reports on 192.168.1.1) subnet 255.255.255.0 and (there’s no place like) 127.0.0.1 for DNS.
I turned off the Windows Firewall.
I disabled any other networking adapters I wasn’t using.
I set a continuous ping command running on the laptop to test for when the MR12 was responding.
I used PUTTY to interface with the serial port on the MR12, the settings for putty were connection type Serial, COM4 (whatever com port your USB > TTL adapter is installed on) with a speed setting of: 115200.
TFTP32 to transfer the new firmware.
The 1.4 release for this set of firmware files extracted (you’ll need 7zip) into the root directory of where you installed TFTP32.
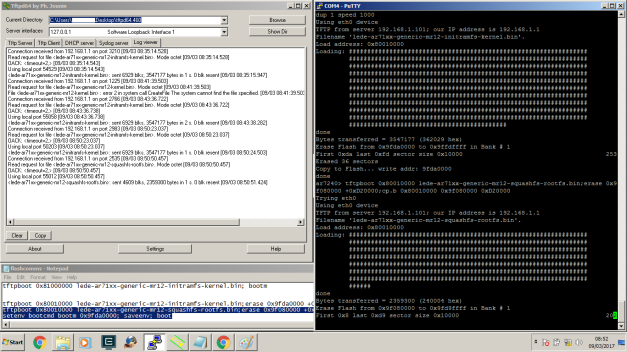
I found that on several github / forum posts the flash commands weren’t quite right for whatever reason so the following is the process I used to get the MR12 up and running.
Once you’ve got all the hardware connected as shown above and you can see some console output from the MR12 in Putty it’s time to test the firmware to ensure everything is working correctly.
Unplug the MR12, when you plug it back in be ready to quickly press a key in Putty to break the boot sequence or it’ll just start booting into the factory image, this can take a few tries if you’ve forgotten to give focus to the Putty window… (doh!).
Once the MR12 boot process has been halted and it is sitting at the ‘AR7240>’ prompt you’re ready to start playing around. I copied all of the comands into a blank notepad document to make copying / pasting easier.
The command below will boot the AP with the new firmware but not write it to the flash, I used this command to test everything was functioning as expected:
tftpboot 0x81000000 lede-ar71xx-generic-mr12-initramfs-kernel.bin; bootm
If everything above went OK and you’re happy to proceed the following commands will get you there, however remember that once you’ve done this as far as I’m aware it’s there for keeps… I suppose you could re-flash it with factory firmware but I’ll never do this so I’m not sure what the process for that would be.
Reboot the AP, break the boot sequence and input:
tftpboot 0x80010000 lede-ar71xx-generic-mr12-squashfs-kernel.bin;erase 0x9fda0000 +0x240000;cp.b 0x80010000 0x9fda0000 0x240000
One the above command has completed input:
tftpboot 0x80010000 lede-ar71xx-generic-mr12-squashfs-rootfs.bin;erase 0x9f080000 +0xD20000;cp.b 0x80010000 0x9f080000 0xD20000
Finally to set it up for good input:
setenv bootcmd bootm 0x9fda0000; saveenv; boot
It’s probably worth doing a reboot on the AP now.
Once it’s back up you should be good to go and have brought a useless brick back to being a useful buliding block for whatever wifi related purpose you have. The new firmware is very comprehensive and holds many fine enterprise level features under its belt so I’ll be using mine to run the wifi out in my home workshop. I hope this guide helps if you’re stuck trying to do this but don’t forget that firmware flashing can be a tricky business and it’s easy to muck things up so I wouldn’t be trying this sort of thing on anything you don’t have a replacement of or would really cry about if it went badly wrong.
Hi everyone I hope you all had a nice time over the holiday period!
Santa Claus was really kind to me this year (probably because I’d been super good all year long!) and brought me several blog worthy items. Leaving aside the toy drone I nearly chewed my son’s face off with (protip: amateur drone pilots should start off outdoors) I got an Ardunio based Weather Station and a CTC 3D printer which (once I have enough mastery of this unwieldy beast) I’m going to be using for rapid prototypes, building enclosures for electronics projects and printing out awesome stuff I find on Thingiverse.
So starting off with the Weather Station below we can see the various components I have collected. The unit is comprised of an Arduino RedBoard, a SparkFun Weather Shield, a Sparkfun Electric Imp Shield and an Electric Imp. In the background you can see a Rain Meter, Anemometer and Wind Direction Gauge. You can just hook up the Weather Shield and get going but I wanted Wind Speed / Directon and Rainfall so I had a look at the SparkFun website which sells a bunch of those additional meters attached to a suitable bracket. They retail for $76 (plus shipping) whereas I discovered that the Maplin UK website sells replacement meters for a weather station and that I was able to get all three for £17.47 which seemed like a better idea considering they’re (from what I can tell) exactly the same as the ones on Sparkfun. The first steps of the project are complete as I have soldered on the header pins to the RedBoard and the two RJ11 ports for the external meters. The Sparkfun Weather Shield takes care of barometric pressure, relative humidity, luminosity and temperature on-board and could also feature GPS timing but for my application I’m not going to install that capability just yet.
For connectivity I’m using the Electric Imp (which I hadn’t had any experience of before this project and I have to say, I’m extremely impressed with) to hook into my home WiFi and report the data to the Weather Underground service which I ultimately hope to configure my iPad to display.


I need to work on the code and see what I can get this thing to report, it should be fairly straight forward enough but I’m currently stuck trying to figure out how to combine the signal from the Anemometer and Wind Direction meters as they seem to feed into the same pins of the RJ11 ports… I’ll have to have a better look at the datasheet… As usual…
I’ve wanted to build a weather station for a very long time, probably since I was at High School some 19 years ago now and got involved with the electronics club. Now that I’m older and have a family and considering my son is starting to become interested in computing (read: he’s nearly 7 and heavily into Minecraft) I thought it would be nice to include him in this project so he can see some relationship between physical/mechanical action and the software based representation of that. I find that children respond to things they can see (i.e. an Anemometer spinning causing a digital meter to increase) better than trying to get them interested in some mundane aspect of coding that will never inspire them. I hope to get this project moving along again soon and I’ll report back here with our progress.
So the second item I wanted to talk about was my 3D Printer. I got a Makerbot Replicator clone made by CTC which for what it cost (under £300!) I’m very satisfied with.


My only previous experience was with an actual Makerbot Replicator at the office but I only ever really got to watch it output small test items so this whole experience has been a steep learning curve (it still is!) but I’m starting to get the hang of it and I’m able to print out some nice items. Out of the box you get about a third of a spool of PLA (I love the smell of polylactic acid in the morning!) which I’ve been using to dial in my understanding of balancing build area temperature with extruder temperature with ambient room temperature with the alignment of Venus and Jupiter and… you get the idea.
It seems to be all about getting a spool of filament and printing out a few tests of the same object until you have learned what combination best works. There’s a lot of ‘What settings for XYZ should I use’ questions asked of Google which I doubt will be fruitful as it depends on the model you’re printing, the quality of the filament and probably several other things I’m overlooking. A big problem seems to be that people can’t get their prints to stick to the build area and they try everything from hairspray to a glue stick whereas my printer has never had a problem getting anything to stick to the bed. Maybe I’m just lucky but I always like to crawl before I walk and I’ve spent my time fiddling with minor settings for basic models rather than attempting some monumental build which fails at 78% for whatever reason and you have to start again after much muted cursing. I joined a forum for this model printer and since it’s a clone of a Makerbot it’s pretty well catered for when it comes to printable upgrades.
I’m using my MacBook Pro to generate the .x3g files onto an SD card and then printing them out from the printer front panel interface rather than directly from software over USB.
Once I learn more about the whole 3D printing ‘thing’ I’ll be able to add more but for now here’s some pictures of stuff I’ve printed:


It’s far too early for me to speak with any real authority over the CTC 3D printer but so far I have found it to be a good quality unit (once you tighten up all the nuts that have gone slack during shipping) which will produce impressive prints and smell a bit like popcorn while it’s doing it. I am still learning how to get the best results and it’s not always easy and quite often frustrating but oh boy am I glad I joined the 3D printing revolution at last!
I have written about going to Newark Antique Fair in the past however this time around I’m giving my Father a helping hand as every so often he amasses enough stock to warrant recycling it back into the great swirling currency of old things and making himself enough money to go out and buy some more.
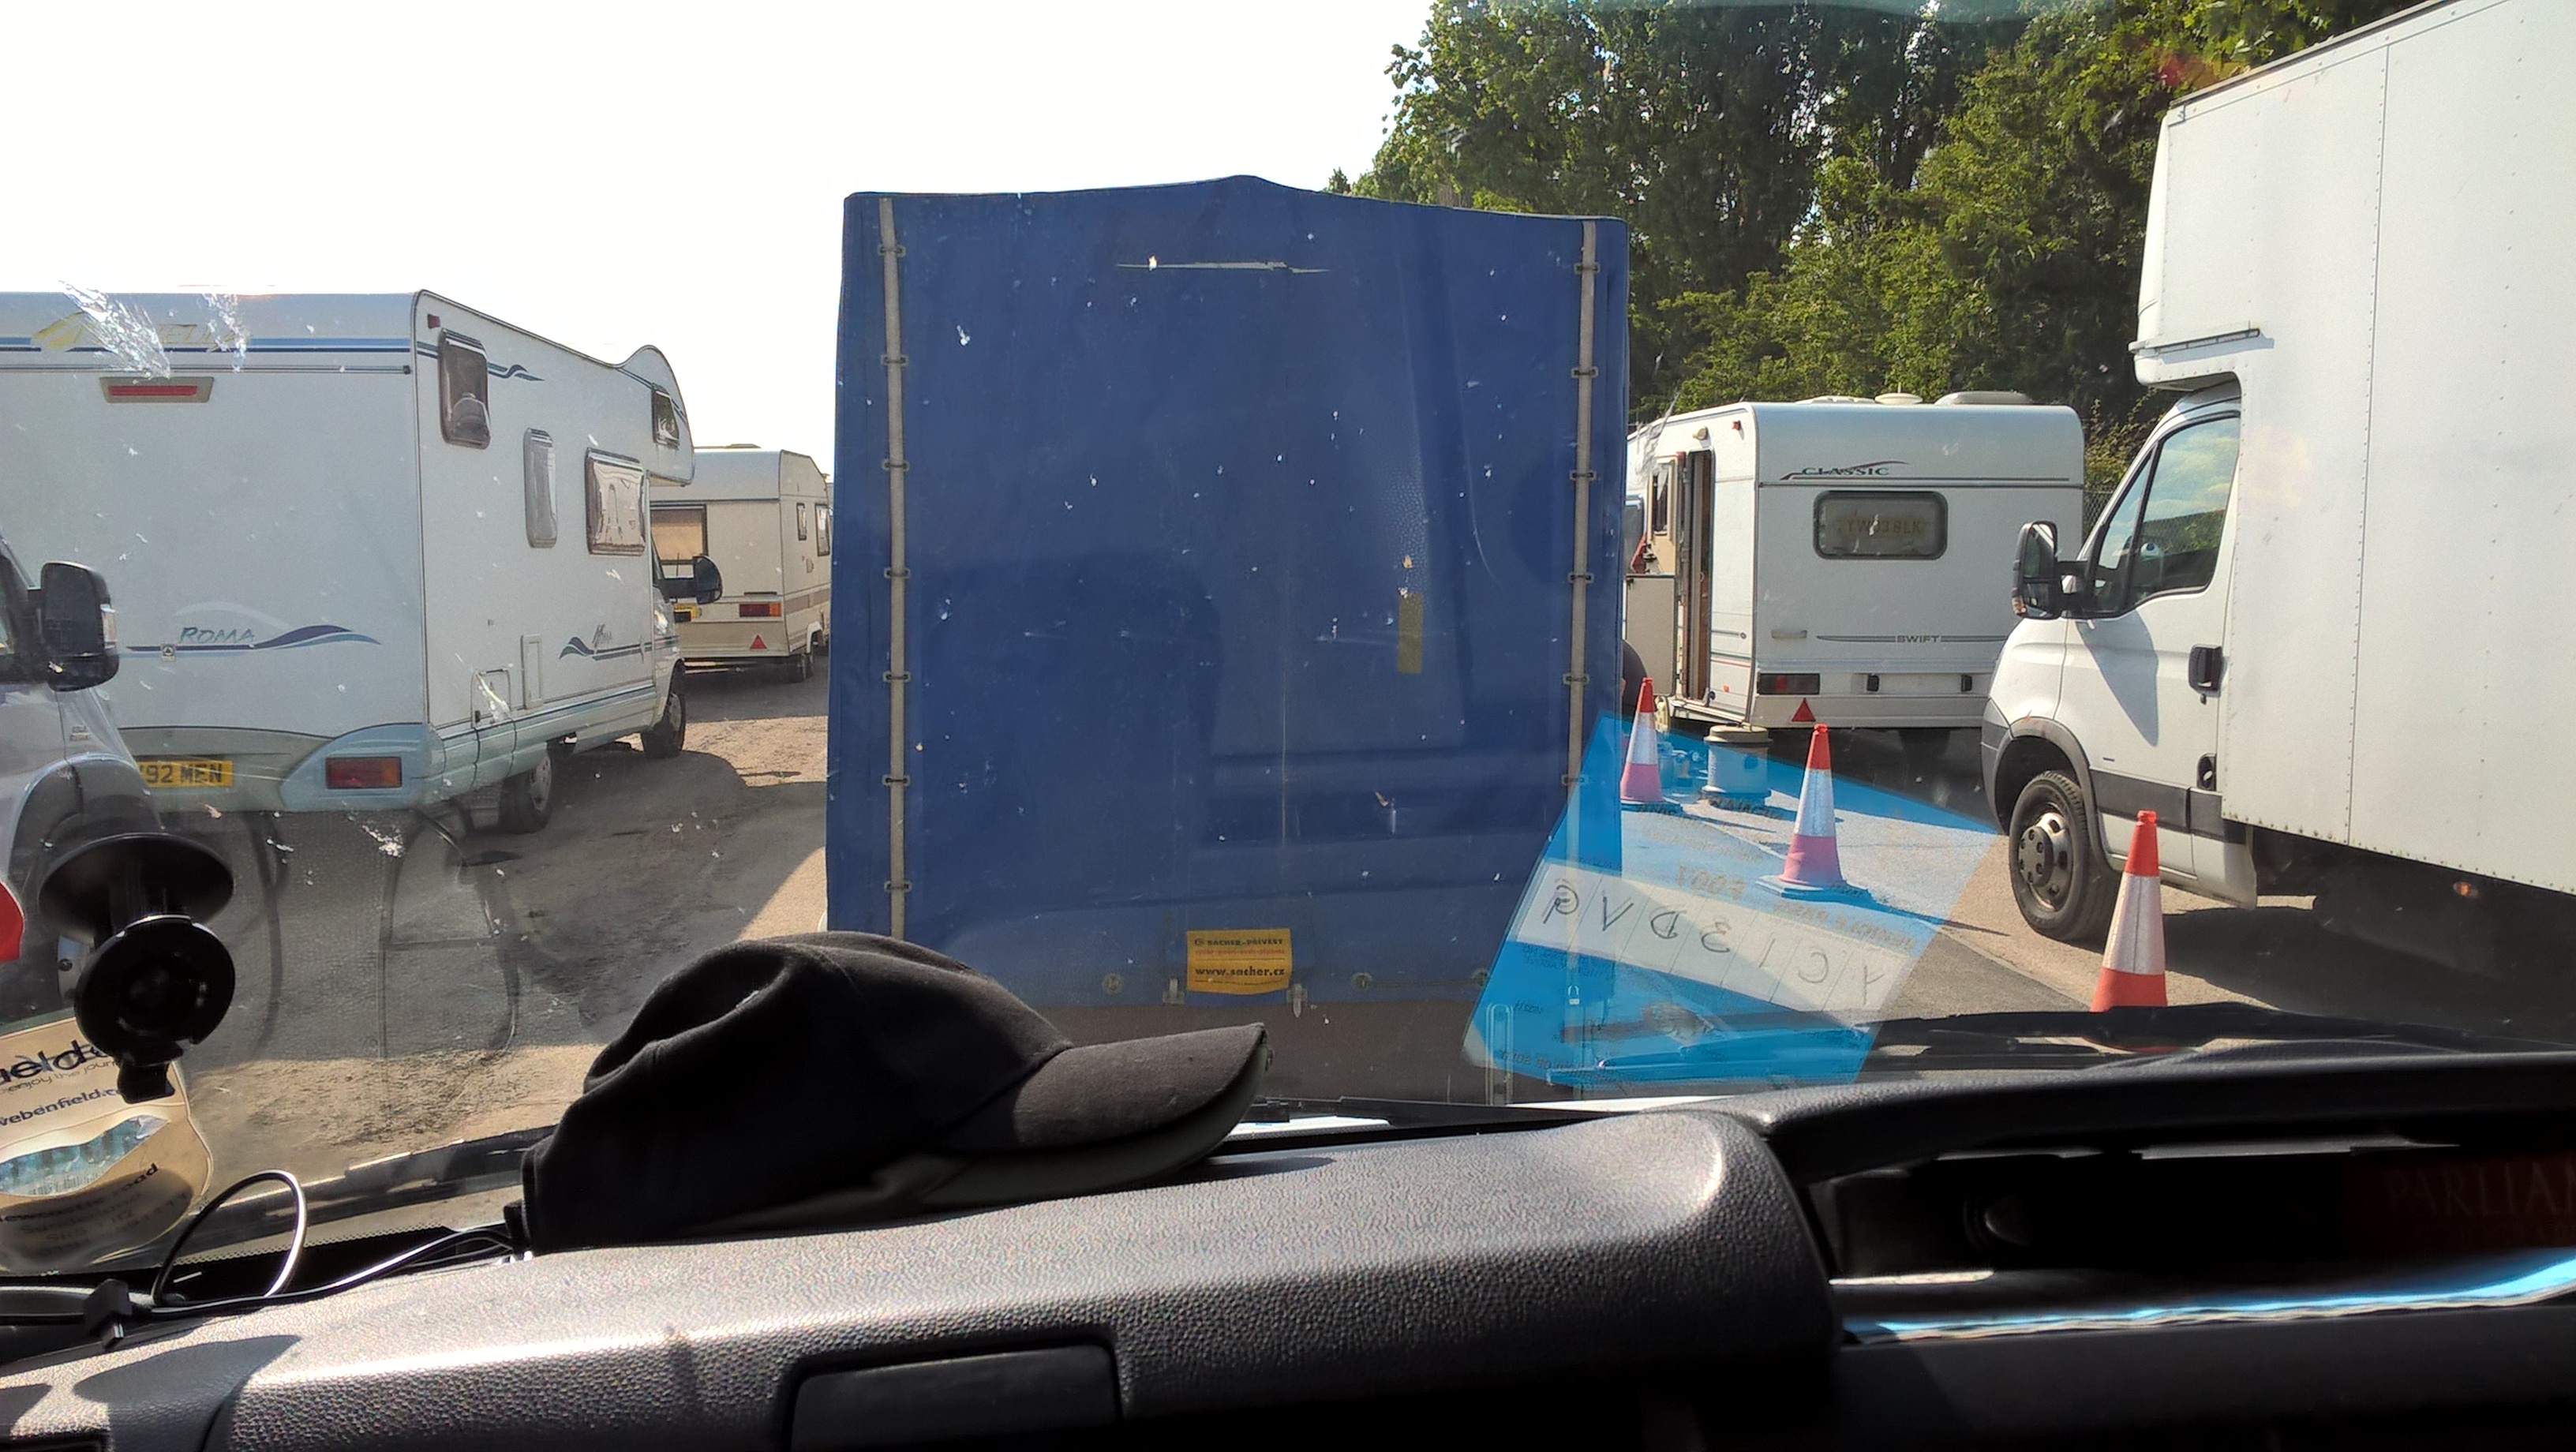
So right now I’m sitting in a white Ford Transit van that’s been packed fuller than a metro train during rush hour in Tokyo and one that has taken a significant hit at some point under one side of the body.
For us to even get to Newark we have to drive about 160 or so miles south from home but it’s mostly motorway work so we ranted about politics and general life and the time passed amiably enough. The thing about going to Newark to sell things rather than to just buy is that in order to set up shop and avoid the scrum at 7am (when the organisers fling open the gates and there’s a scene that resembles playing a rugby match with the All Blacks and something from Mad Max) you have to get there early.
Needless to say my Father decided to go maximum Dad Mode and here’s the view I have for the next 17 hours while we wait for something to happen.
The decision to get there with all that time to spare was non-negotiable.
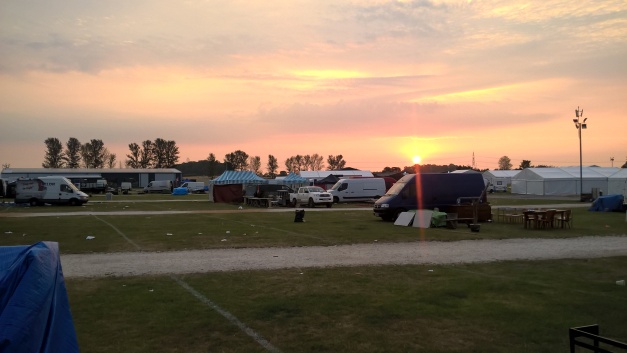
Through bitter experience my Father knew that to have enough time to make a good show of it all you have to get there early and wait. It’s a good idea to bring along a (power)book and get on with something productive yet time consuming however we don’t own this van and I had no time to consider things like how to power various electronics before we left so I had a considerable wait on my hands. We chose to idle some of the time away by exploring the site (Newark is hosted on an old air field and evidence of this is scattered around) and cooking hot dogs. Below we can see a picture I took while wandering around, it’s a vast area but essentially surrounded by nothing but open fields and the entertainment value is as such.

The place has fences up all around and as we were wandering my Dad told me about the time he’d gone there to buy things with a couple of mates and while waiting in line to buy a ticket a shadowy bloke appeared on the inside of the fence and managed flog one of his mates a cheap ticket which turned out to be a phony, sending him into a bloodthirsty rage. Swearing revenge he had to pony up and pay again and once inside had to call off his personal manhunt as it was clearly hopeless.
On a side note we lifted up a random traffic cone and found the leftovers of what looks like an Ant colony…

Further up the old runway we saw that there’s a small golf course and driving range where I was delighted to while away several seconds collecting wayward balls that had managed to land absolutely nowhere near their intended target and end up under bushes and hedges. High on the prospect of a fortune in Slazenger golf balls we decided to retire to the van for the remainder of the evening.
So, after a night that my mother once described as “worse than giving birth” I was now able to fully empathise having shared the experience of trying to sleep in the front cabin of a Transit, which had now developed its own special waterboarding technique just for me. The original plan was for my Father and I to use the Two Man (untested) tent my mother had purchased especially for this occasion. Surely a couple of nights in a popup tent with thick enough foam mattresses would be doable… Sadly on inspection we discovered the claims of being ‘Two Man’ was greatly exaggerated as it was indeed one man at best. I decided to forgo my place in the tent and try the van out which at first seemed OK but after an hour or so turned into a claustrophobic nightmare punctuated by the shrieking of my foamy mattress who’s only feasible position in the cabin was jammed against the leather boot of the gear stick in the middle of the dashboard. Alas every tiny movement I made amplified the foam on faux-leather gearstick boot screams.
On the day of the sale I was up at 5:20 am and even though it was very early and I looked pretty grim I was elated to be out of my banshee’s coffin and have something to get on with as all this waiting around was boring.
Our setup on the first morning:
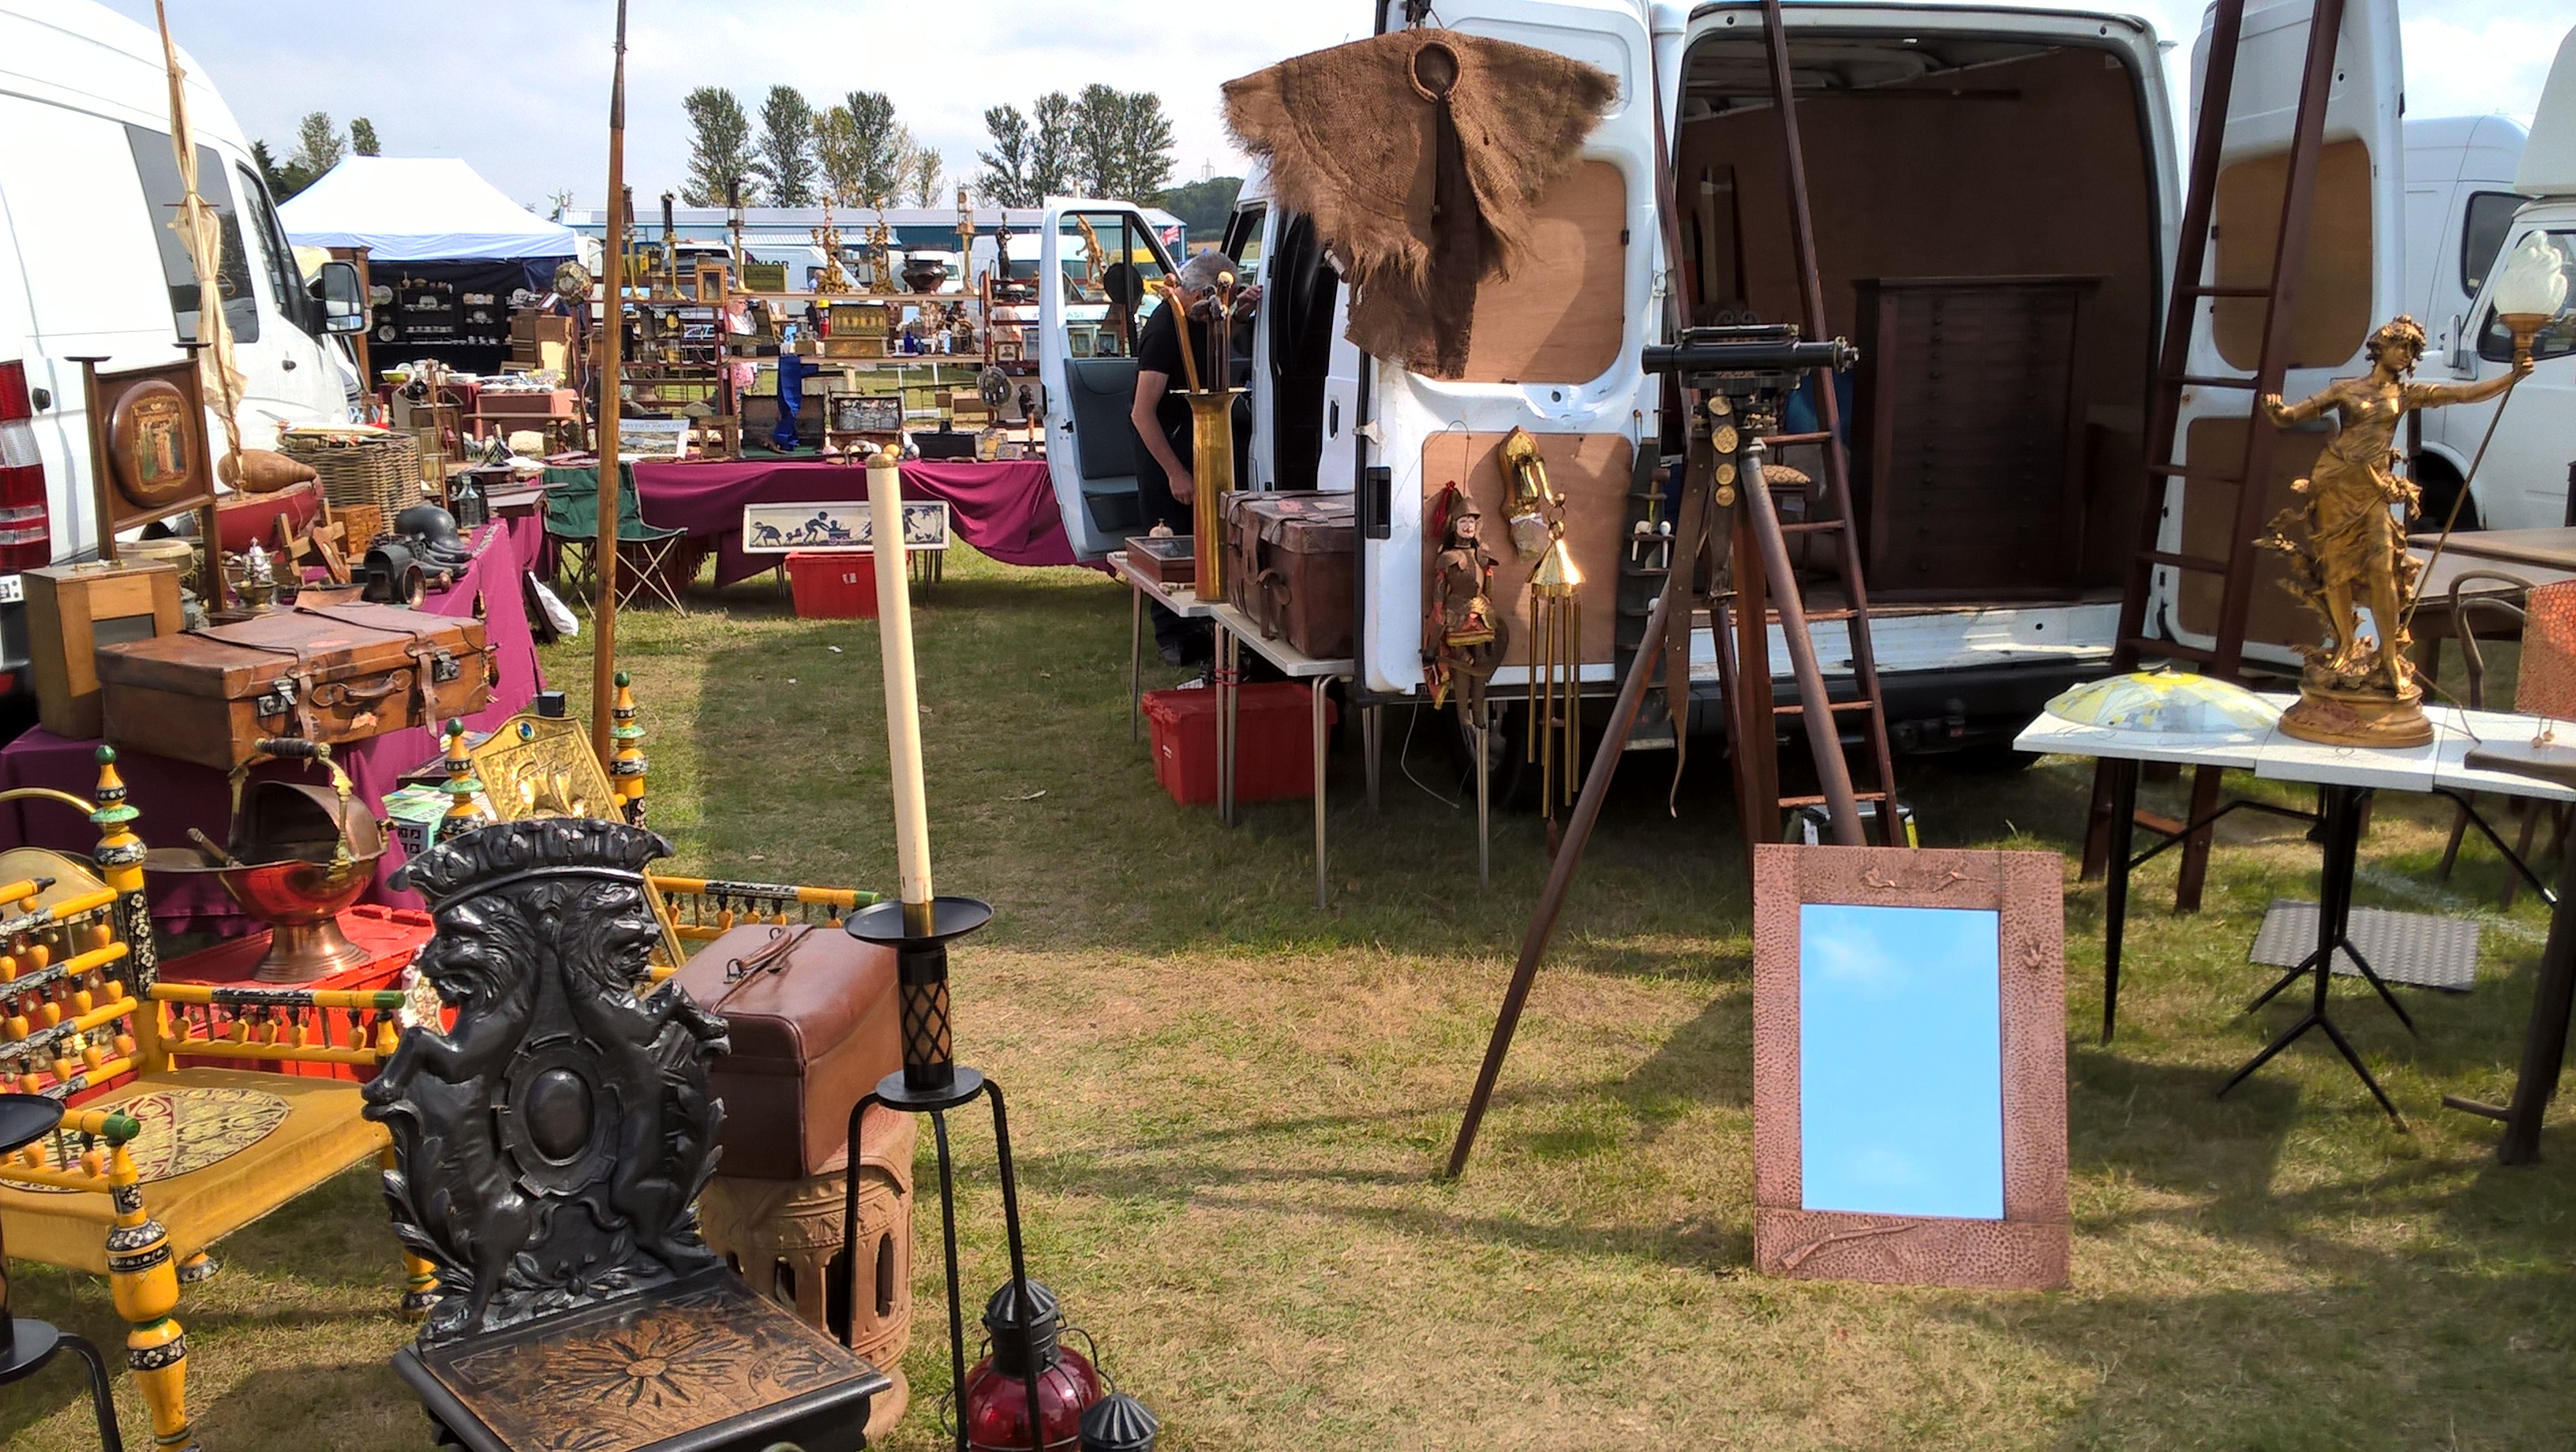
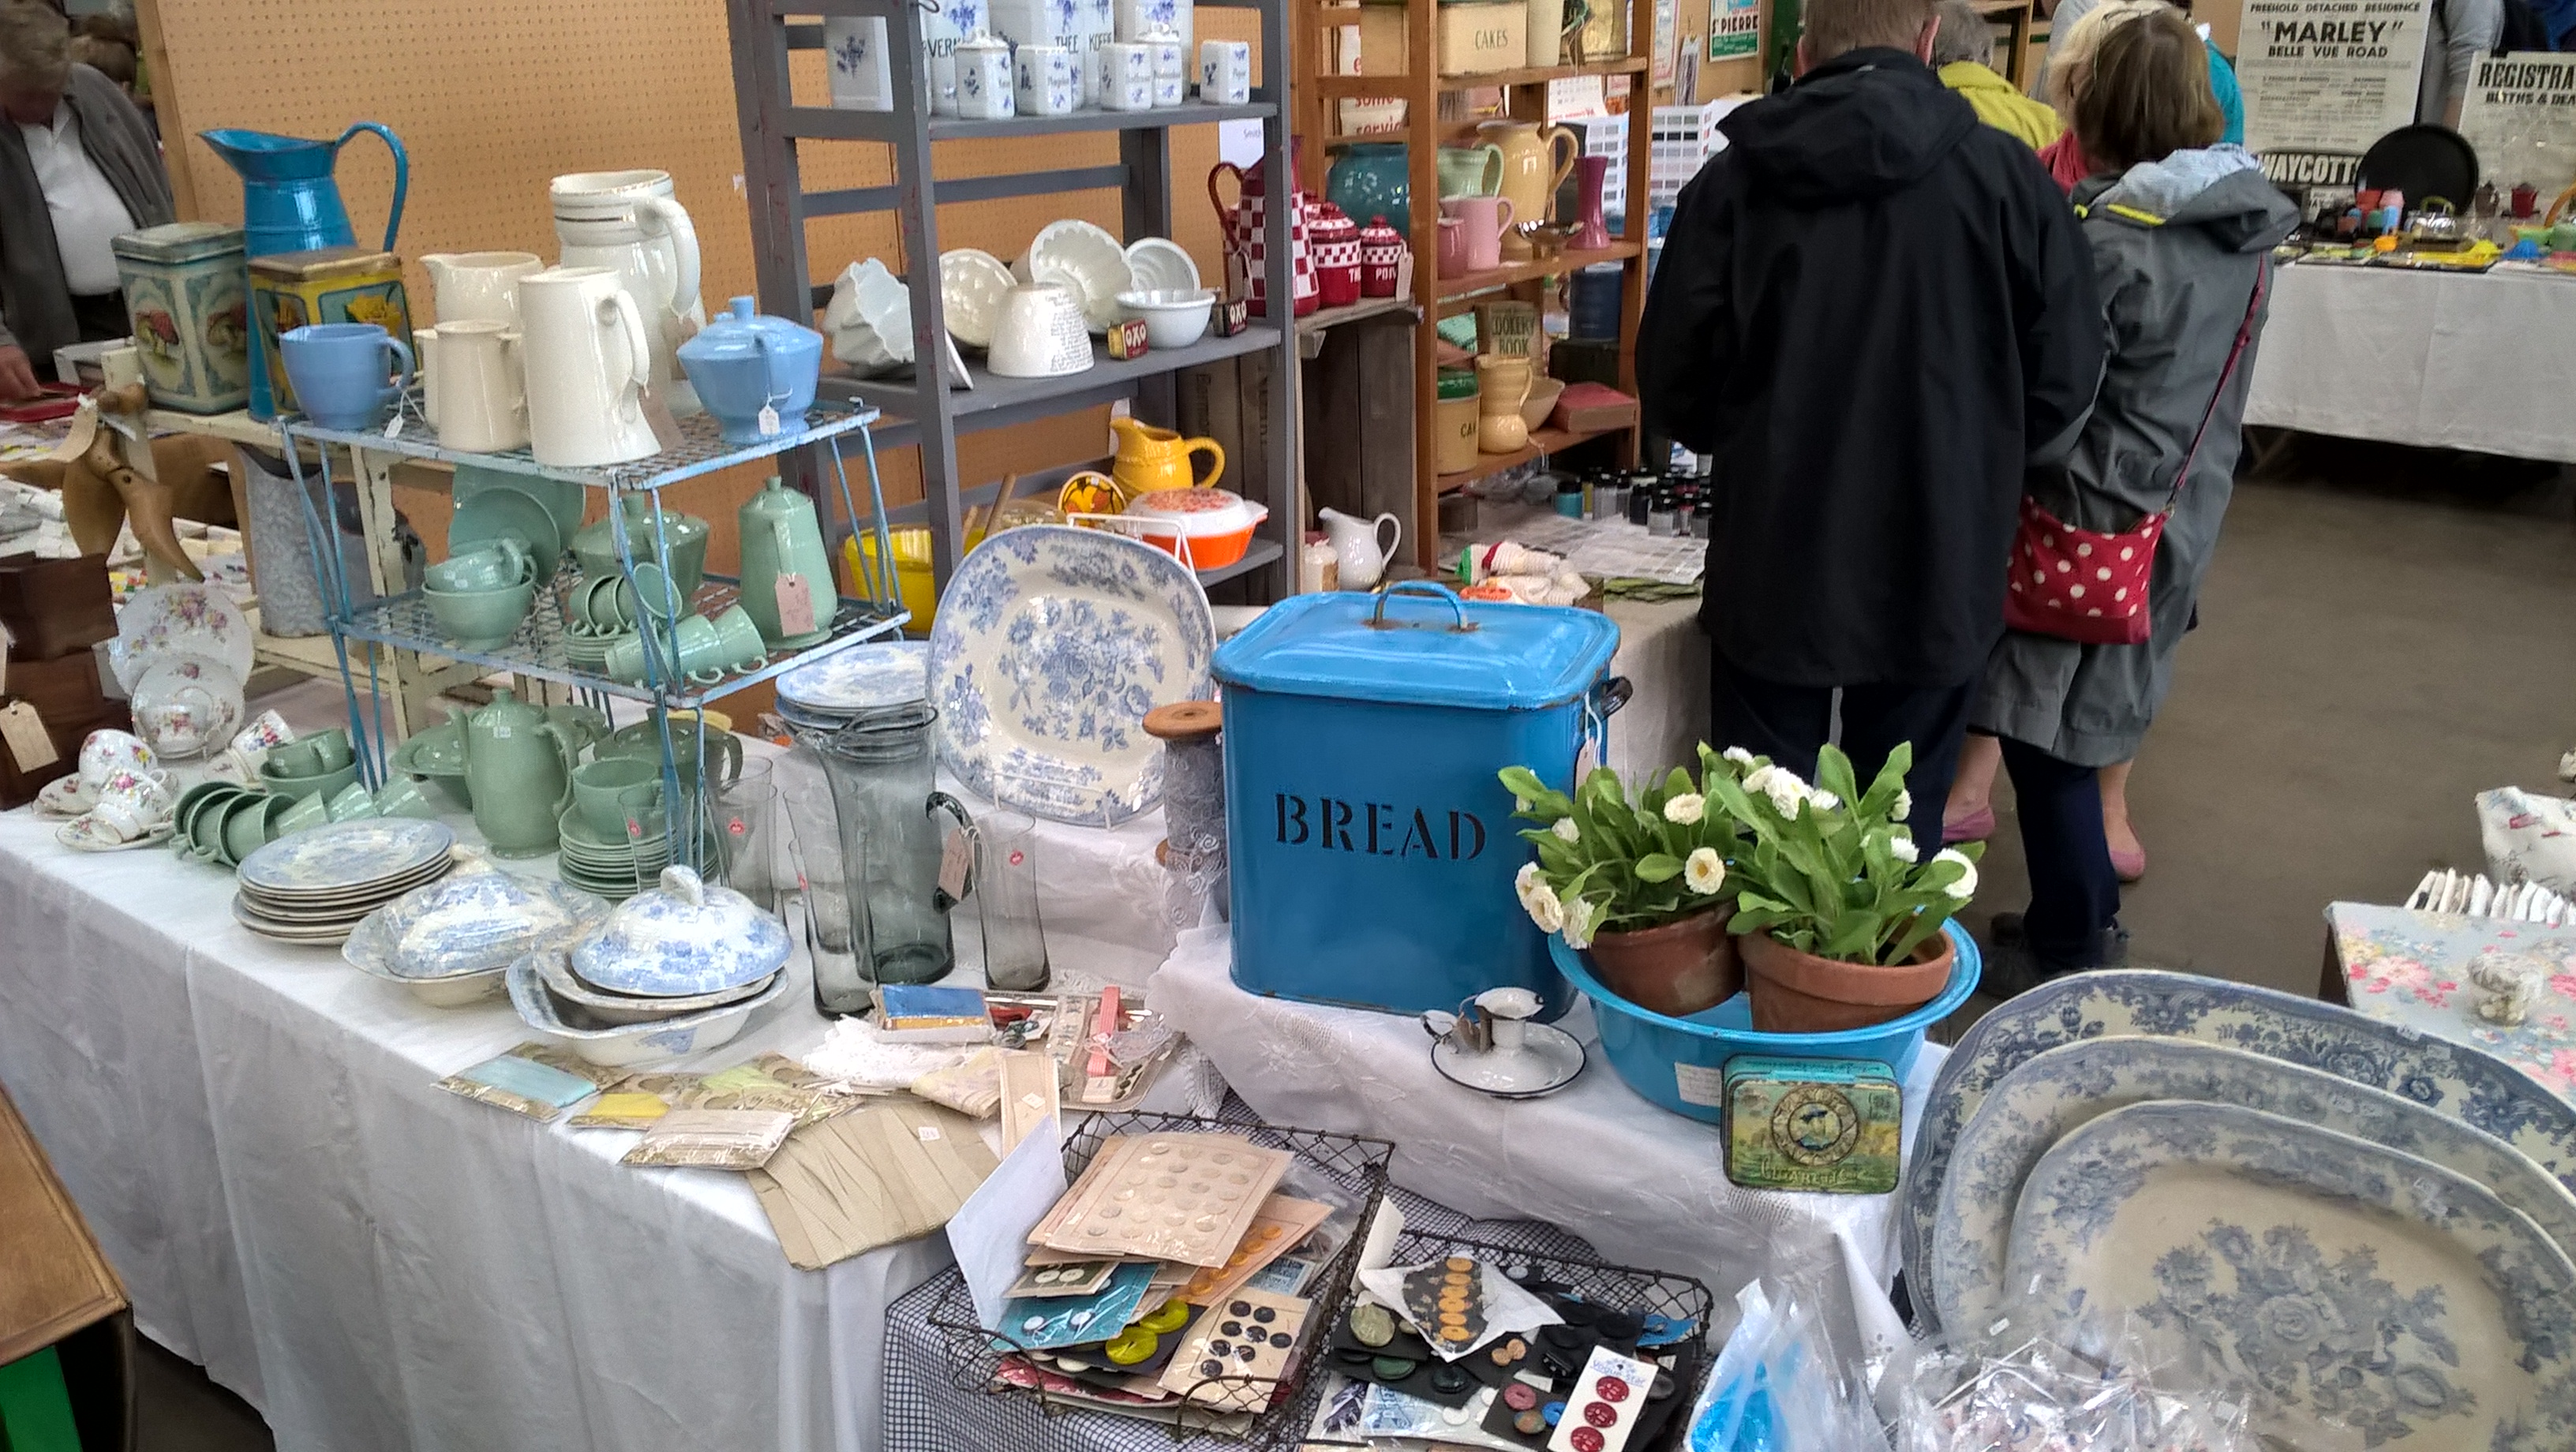
All manner of assorted items had sprung from the back of the van and assumed what we hoped would be the correct position with which to show off their best qualities. I even brought along a box of random retro bits I had no desire to hold onto any more.
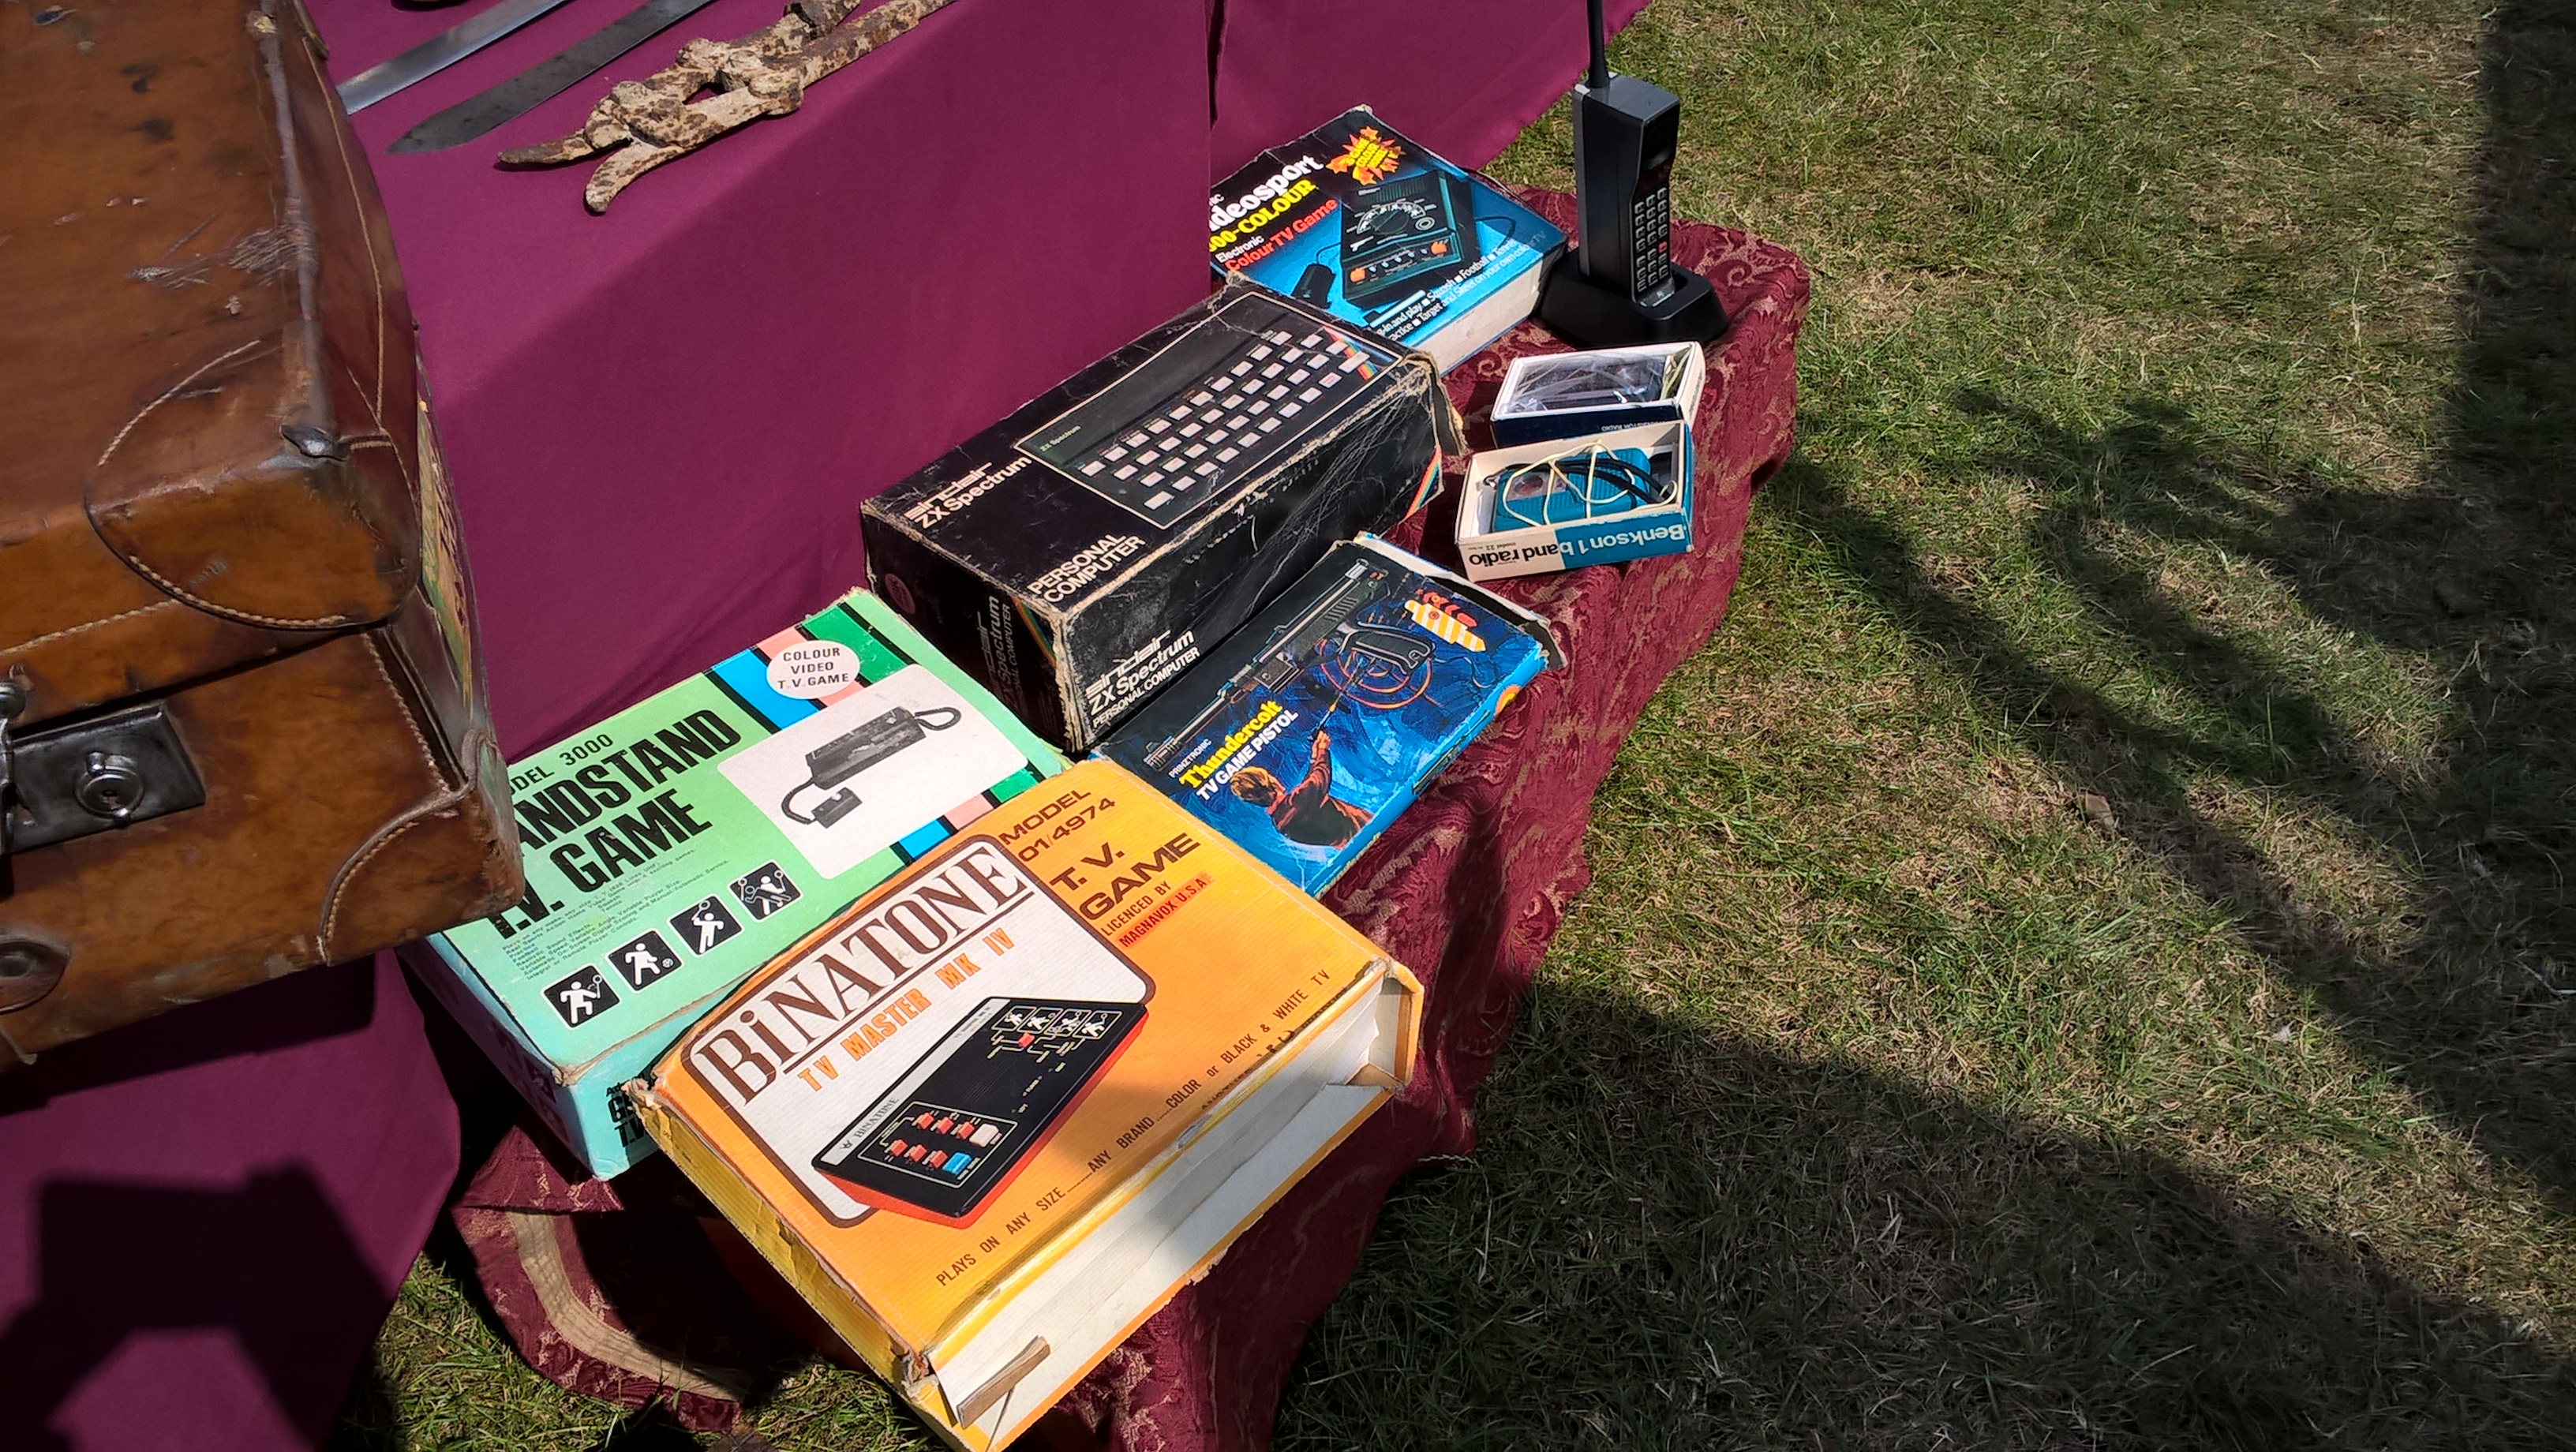
I had high hopes for the ZX Spectrum but in the end I let it go for pennies as it turned out this machine (despite being in good condition) was the one cursed with a lack of memory and was therefore not that popular. I had thought someone might like it for a shelf piece so in the end I wasn’t too concerned about making a few quid on something I picked up for nothing in the first place. I sold the radios to a guy as a package deal after explaining I had five starving children to feed and there was no way was I going to cave in to his low-ball offers. I also managed to sell a Japanese Mino raincoat (the brown hairy looking thing in the first picture above) after I told a passing woman it would look lovely with her blouse.
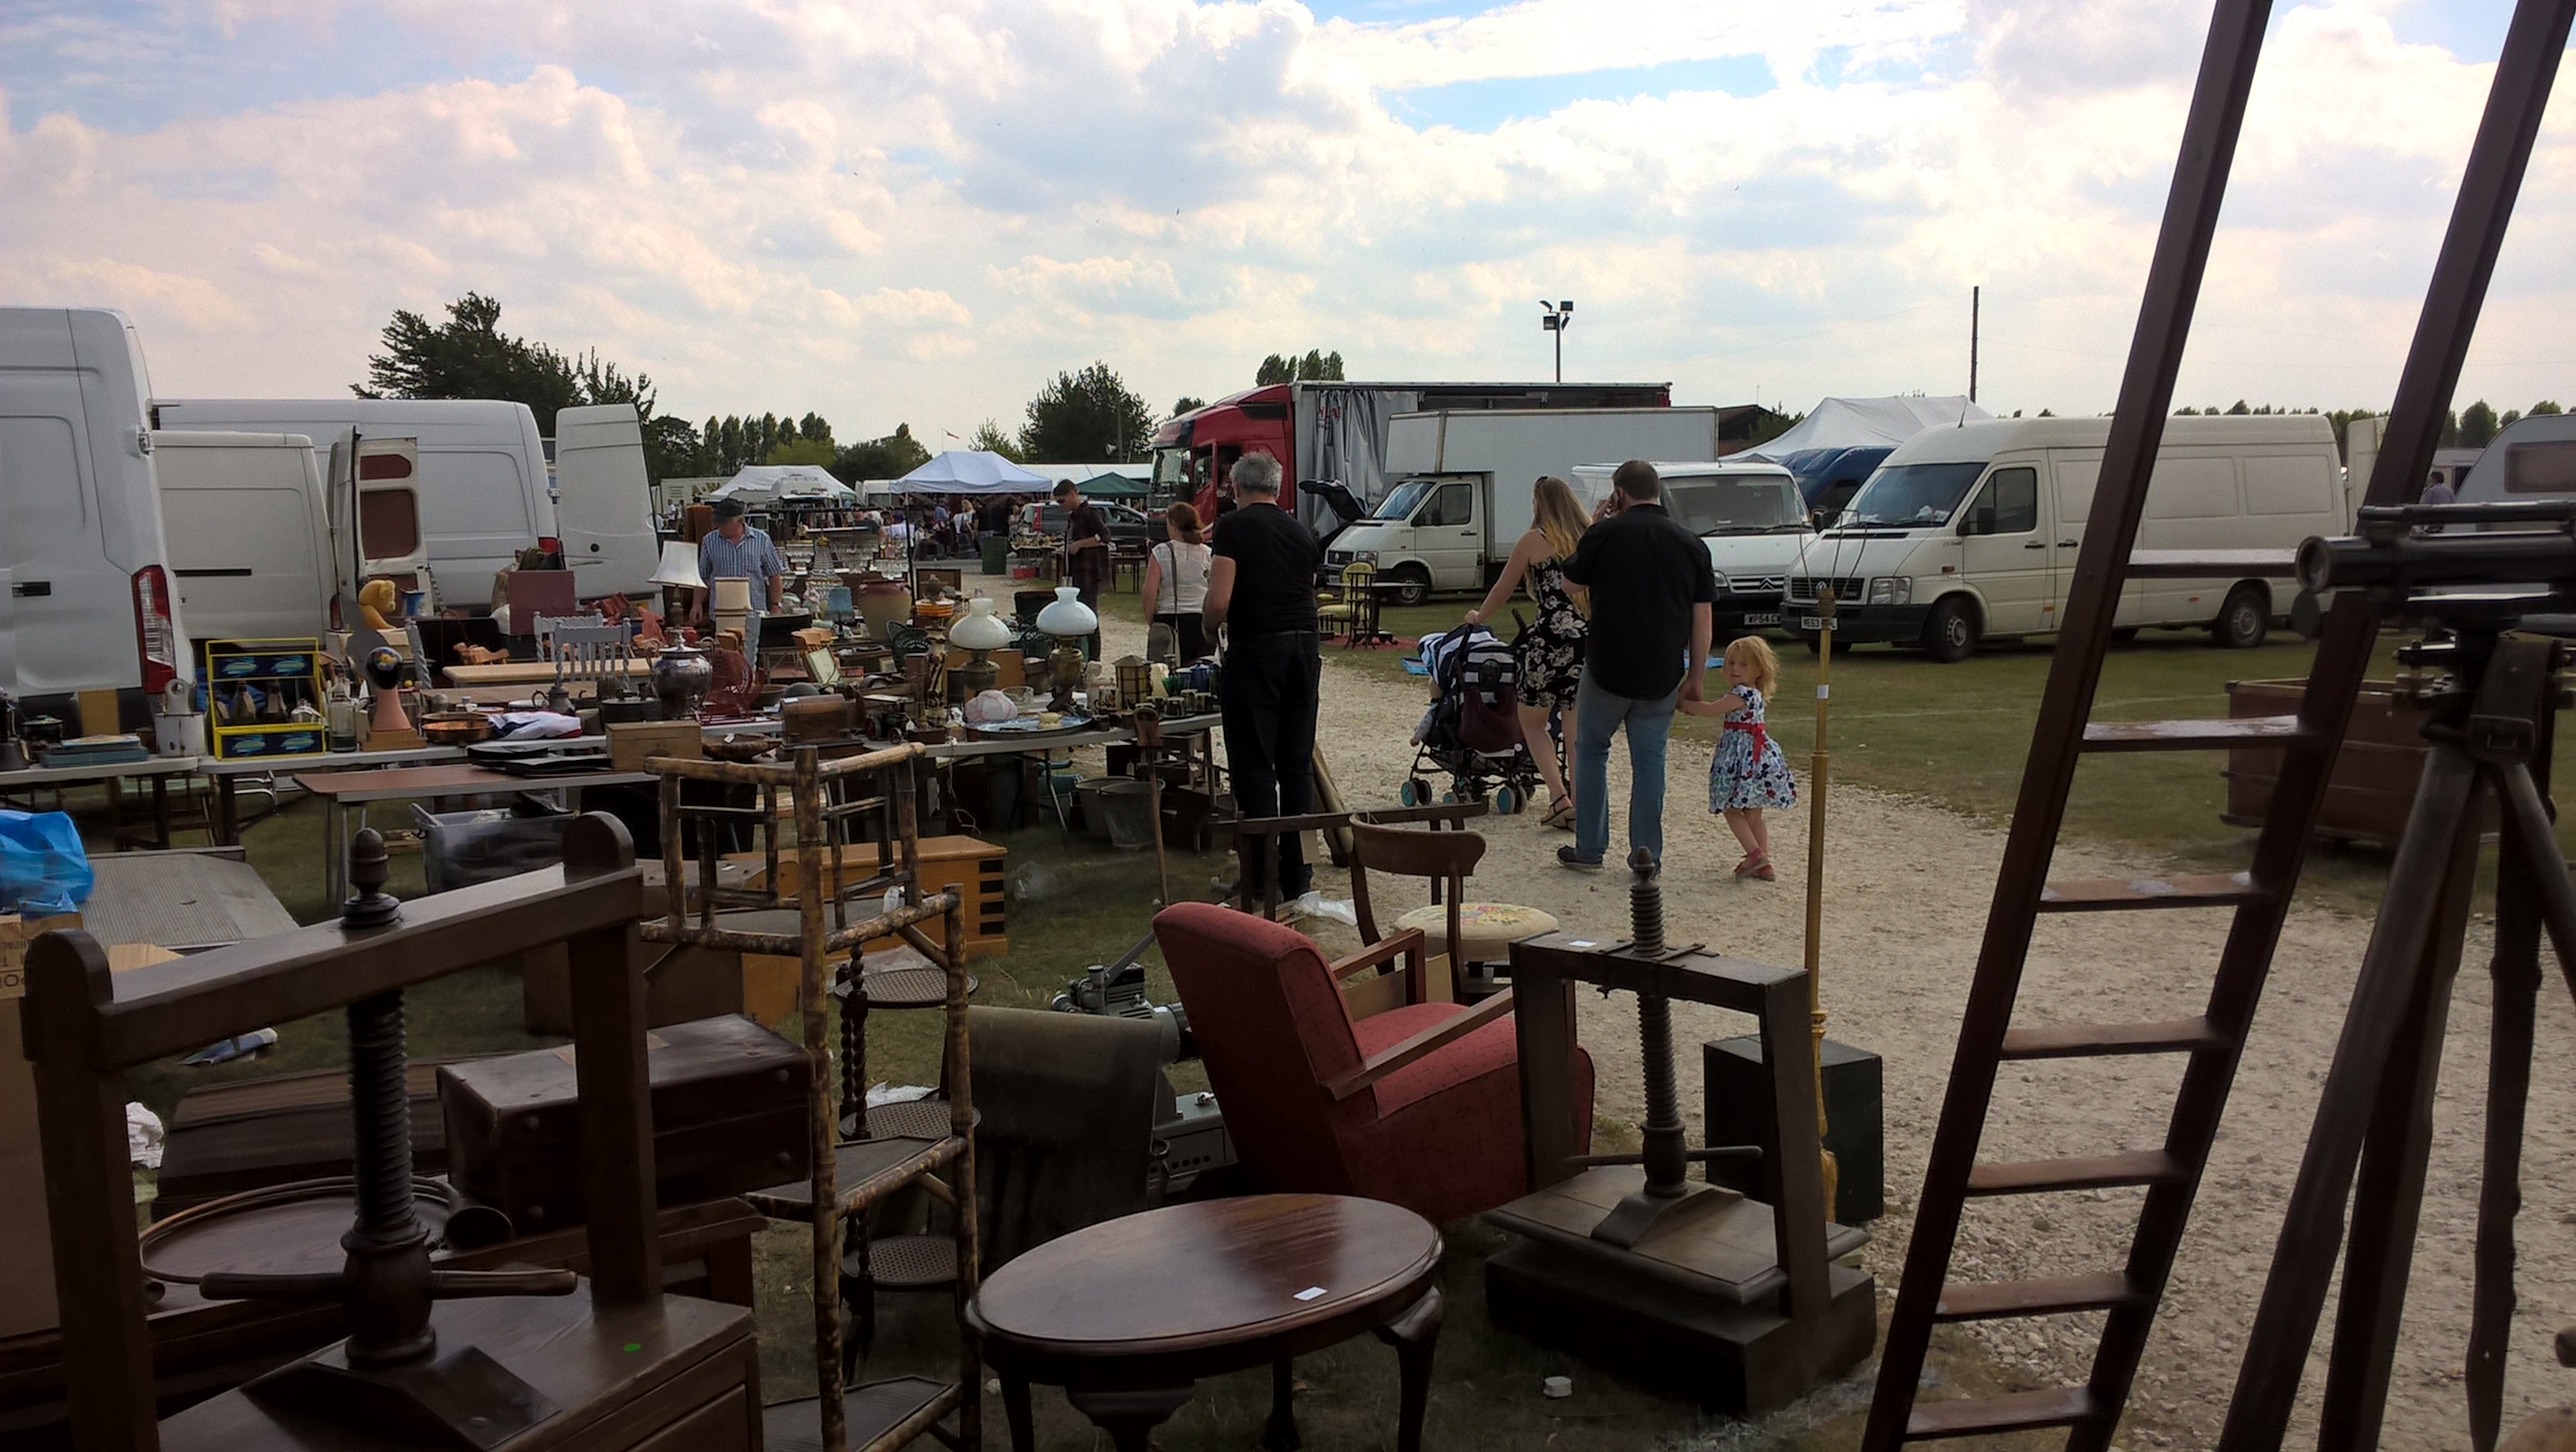
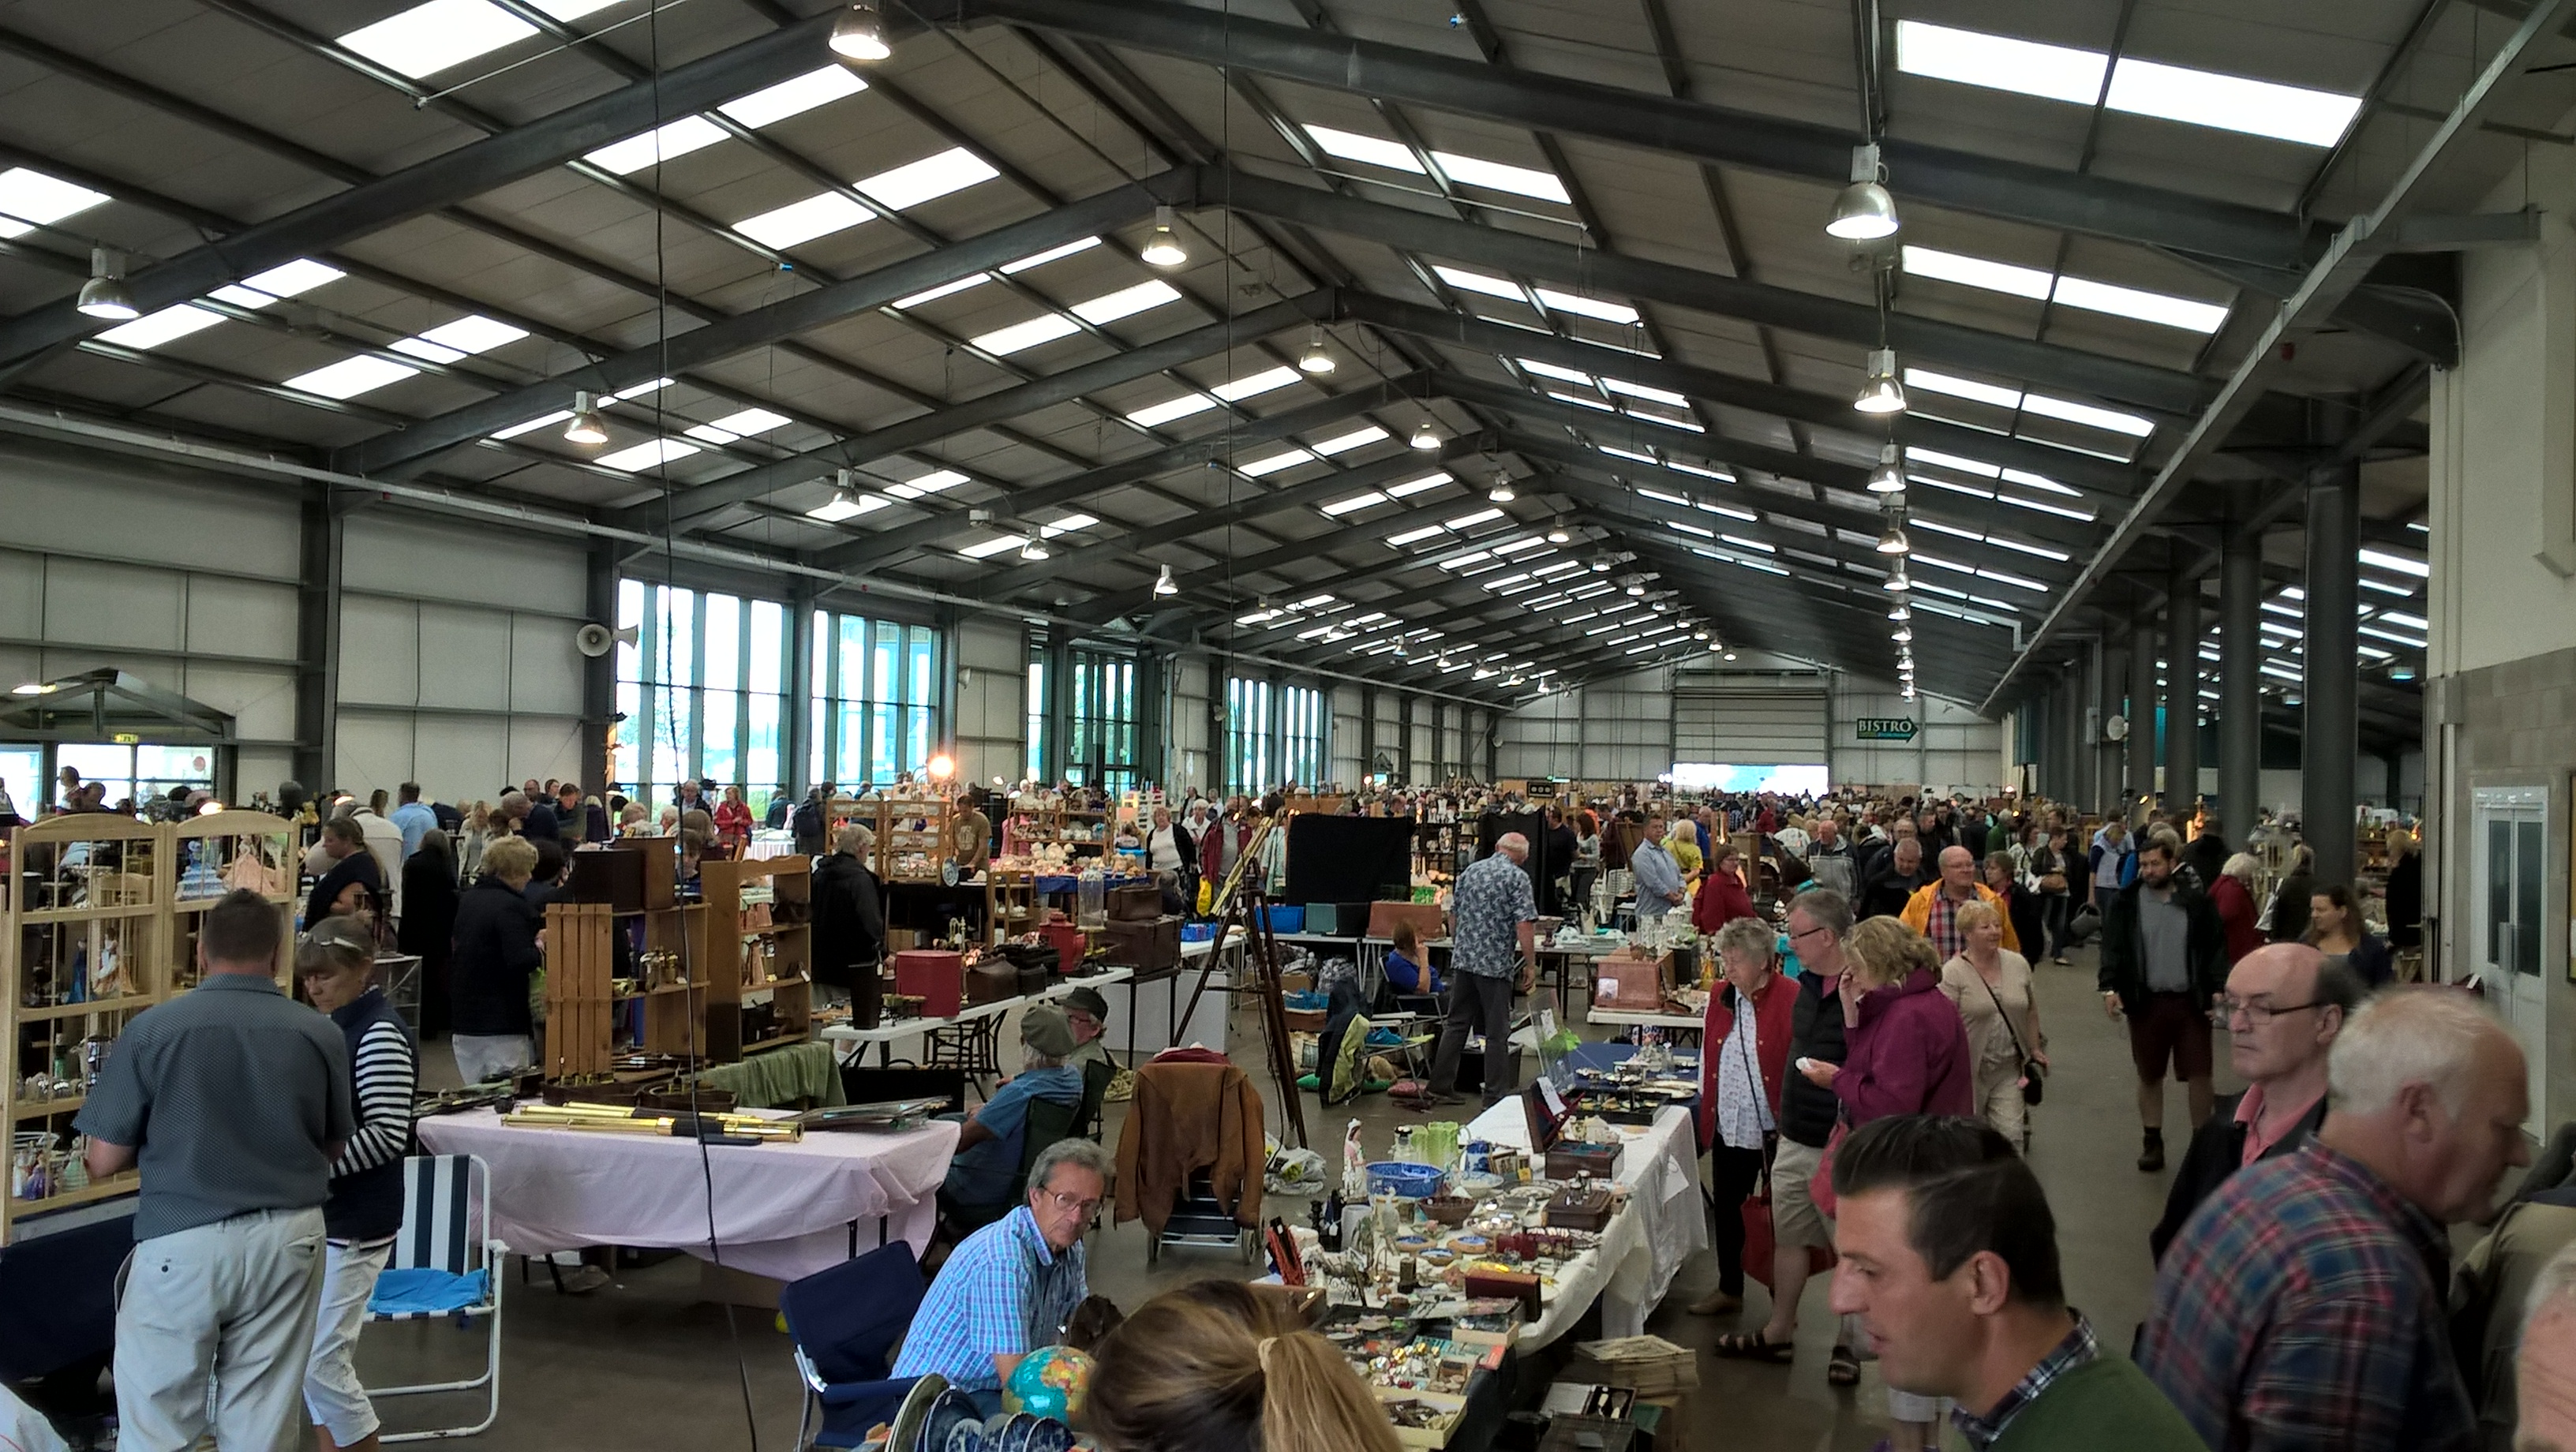
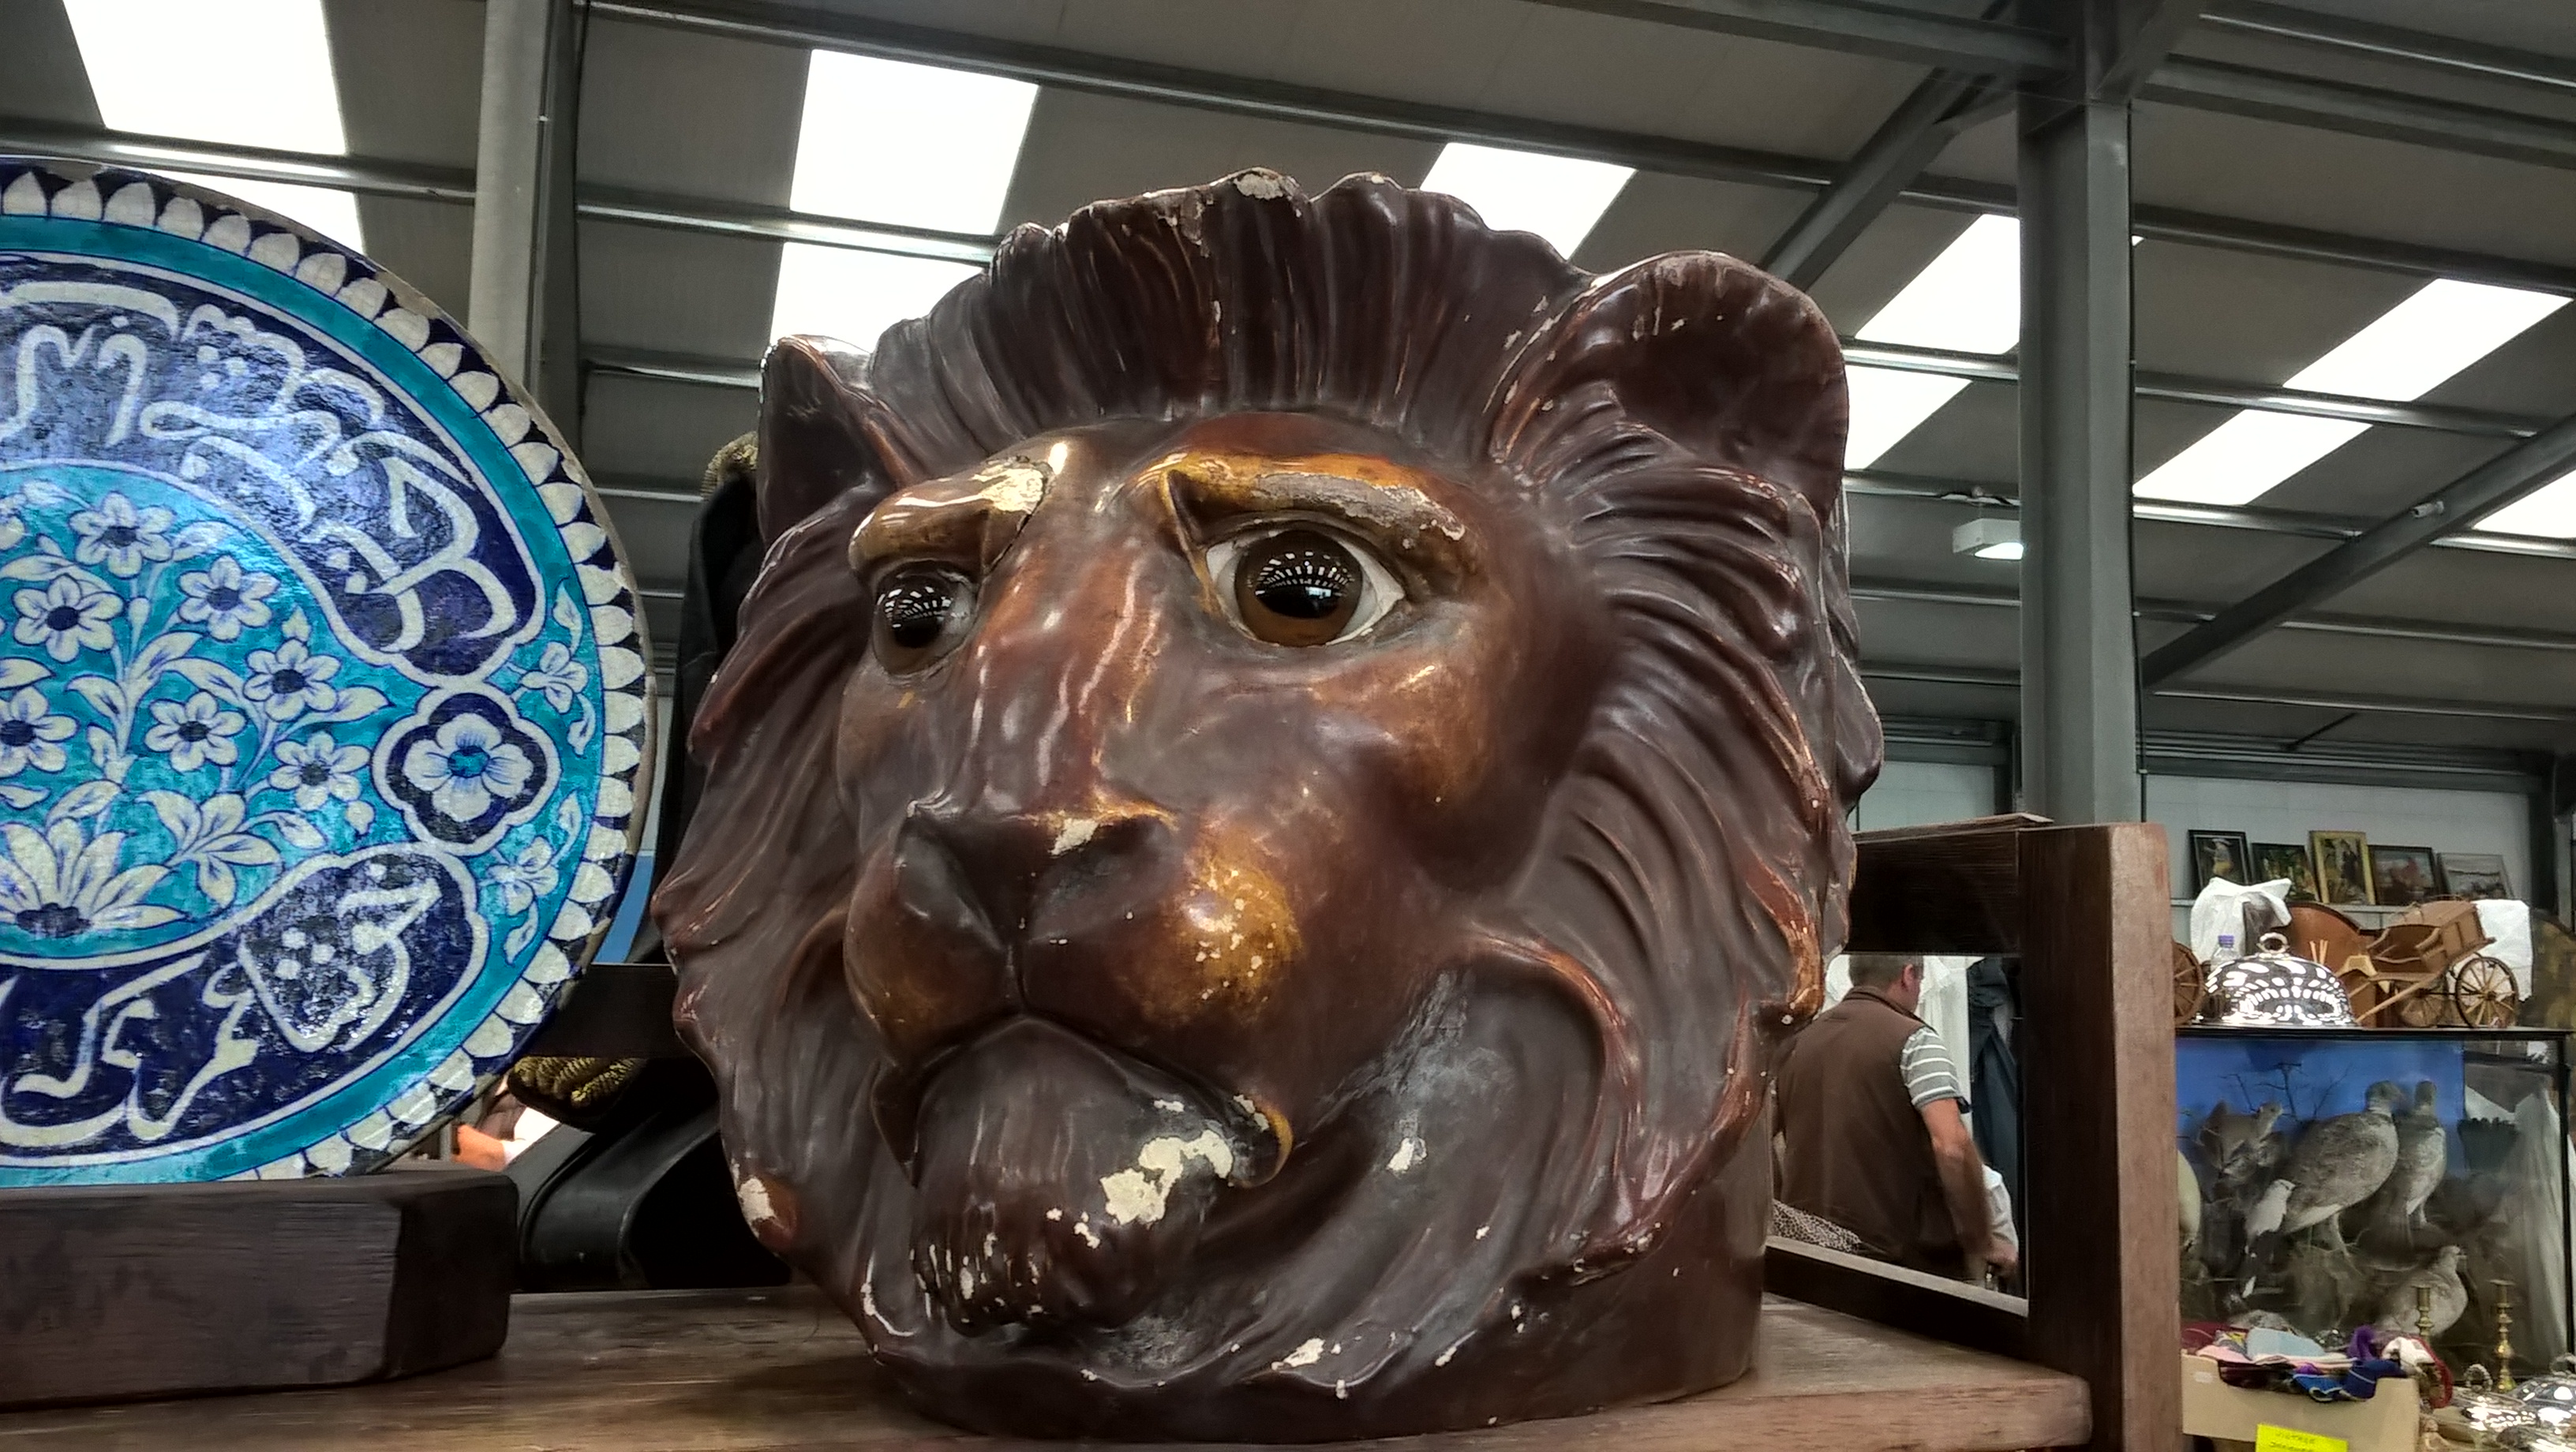
One of the benefits of being second in command was that I was able to go for a walk around and look at the other things people had for sale. There are large indoor setups to browse:
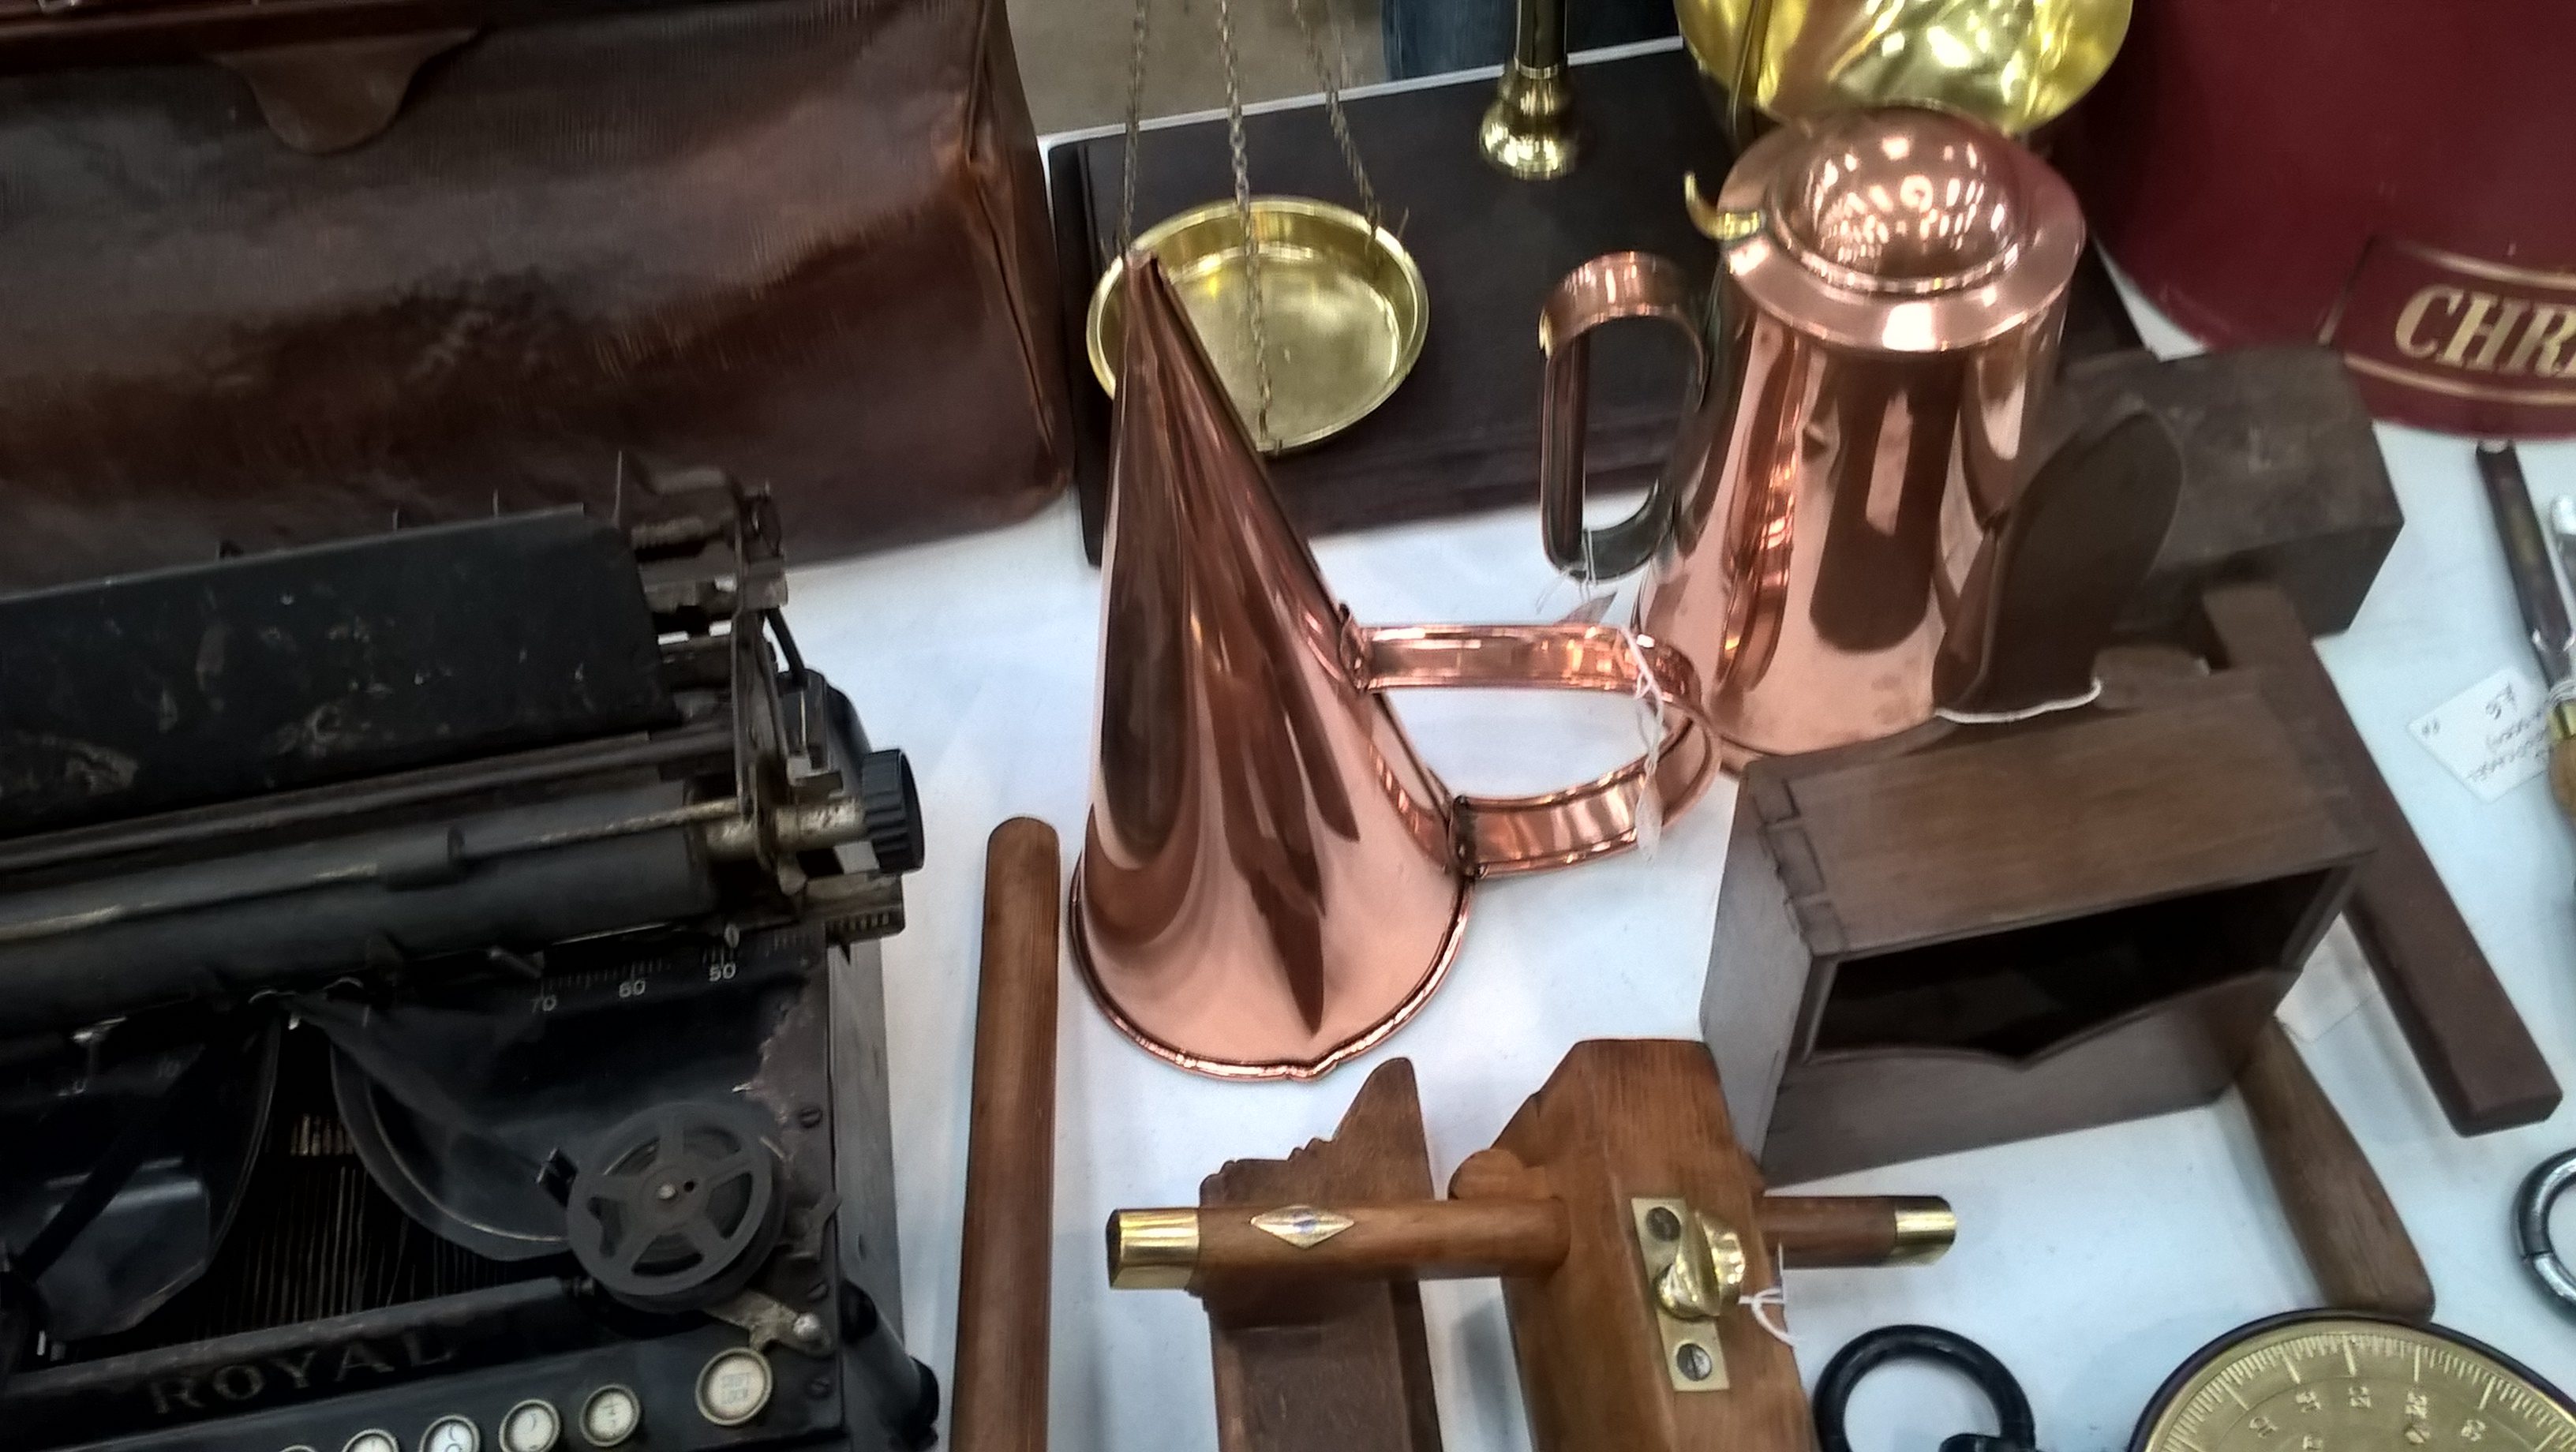
Newark is always a great education and I spotted this shiny cone shaped device on a stall that belonged to some vague acquaintance of my Father.
…My best friend had acquired one of them some time ago and its use was a complete mystery, we had some thought that it had something to do with brewing and we ended up being nearly right as the cone thing is actually an Ale warmer at last the mystery is solved!
So the first day ended very well we had sold a good amount and made a good return. We decided to celebrate our achievements by having dinner at one of the on site restaurants and a pint of beer with a Sunday roast is one thing, but four pints of ale shortly before you’re supposed to be going back to try and sleep in the van is another…
We looked like this in the morning:

Protip: Never drink a load of beer before trying to sleep in a van next to your dad.
Sunrise at Newark Antique Fair
If you’re thinking that the picture above is somewhat empty looking you’re right. I learned that if people don’t do so well on the first day, or perhaps sell enough stuff to make their intended financial goal they just pack up and disappear in the night. This can be a bit of a problem as you’re not guaranteed to end up with anyone left beside you which is no good as people are less likely to want to walk over to somewhere miles from the general mass of remaining sellers. Thankfully our plot (007!) was close enough to the edge of where the main marquees are and lots of people were still around.

Most of our stuff was gone by this point and the remaining items were briefly for sale however as my Mother had kept reminding me via text message rain was due and about 4 hours or so into the morning I was wishing I hadn’t sold that Japanese Mino as I could really use it right now. Indeed the heavens opened and a torrent of rain forced us to hastily pack up our stall and curse the weather. When I mentioned earlier that the van had taken a knock at some point what I discovered was that when it started to rain and we had to rush to pack things up I put my pair of boots under the van to keep them dry however due to whichever sod previously bashing the thing the dent they made created an ideal channel for the rain running off the side of the van which I had now managed to place my boots directly under. Had I filmed the moment I could have had 250 quid from some crap version of you’ve been framed. Here we are looking like two drowned rats.

As the old saying goes, it is what it is.
As this is something that neither myself nor my father do for a living it’s possible to view the experience from a somewhat removed perspective as a lot of the people who come here do so to pay the bills and I don’t envy them their grim nomadic lifestyle, but personally I’d had a great time hanging out with my old man and wandering around looking at all the stuff.
We packed up the van and finding its braking capacity to be greatly improved due to the lighter load we headed ever north back home where I was glad to be back with my family and able to get directly into the shower as I felt that I smelled like a hamster.
Got Root?
If not then consider yourself not the true owner of the device you paid for. I spotted this e-reader in one of those technology exchange type places and for a few pounds I had a nice little device to add to my backpack of things I feel the need to carry. The device was in mint condition (probably due to someone finding its small format difficult to live with) and the guy at the shop asked if I wanted to buy any insurance as I was forcing my money into his hand. I told him that as soon as I got it back to my desk I intend to throw a seven on google and totally pwn it, I had no need for his pointless offer.
Getting root on these little things is surprisingly easy to accomplish. Try here maybe, or let me google that for you.


Getting in there is simple enough with a small Phillips screwdriver and a fingernail. The guts of the thing are interesting but for a quick hack focus on that handy mini sd card which you should definitely make a backup of before you begin mucking about with.
I used an sd/micro sd card adapter and my mac mini for this, if you need a hand look here.
There are many interesting modifications available online, from GPS to weather displays and I personally I really like the thing. It’s true there are likely better alternatives if you want an e-reader for reading books, the screen size is a bit limited but I loaded mine with a bunch of pdf manuals and walk-throughs for various complex networking tasks I do at the office that require more than just a login. As a pocket guide you can also SSH into accept no substitute.
The battery life is impressive and it even has a happy face icon pop up when you’re turning it on / updating etc. This adds to the impression of the unit as being a small but quality product, a device that (due to it’s pleasant disposition) has a soul and people pass it around and fiddle with it during slow spots in meetings. Having fully observed this behavior I intend on installing some sort of password sniffer and pwning those bastards as well.
